David Hockney (1937-2026), may he rest in peace, is one of the very, very, few artists I like and admire. He and I seem to be in the minority – in thinking that the main purpose of art is to be a source of joy. There is so much unjoyful art (putting it as kindly and politely as I possibly can!) these days that it makes me cringe, and makes me weary about calling myself an artist – least I be tarnished with the same brush (if you’ll pardon the pun…) and prejudice…
His artwork was far more substance than BS. So many contemporary “artists” are all BS and no substance – indeed this is what “art college” seems to encourage in recent decades – and this is why art is at its worst point in history – at its nadir. They believe it’s all about the concept/idea/s – it doesn’t matter what it looks like or how well executed it is. We totally disagree. Art that would be displayed in no place other than a modern art gallery/museum – because no sane person would have it in their home – is not art at all – its rubbish, pure and simple. Art – that most people who didn’t know who had created it would think it had been created by an unskilled child – is not art at all – its rubbish, pure and simple. Art that only exists in the minds of a very few very “learned” “art critics” (who make their living by bigging-up crap art – and often inventing “meaning” that was never there) – is not art at all – its rubbish, pure and simple…
David Hockney was a very deep thinker, immensely skilled artist, fabulous colourist, unpretentious, and worked all is life doing what he enjoyed doing – exploring new ways of seeing and bringing joy to people. May he rest in peace, and may history bring forth more like him…
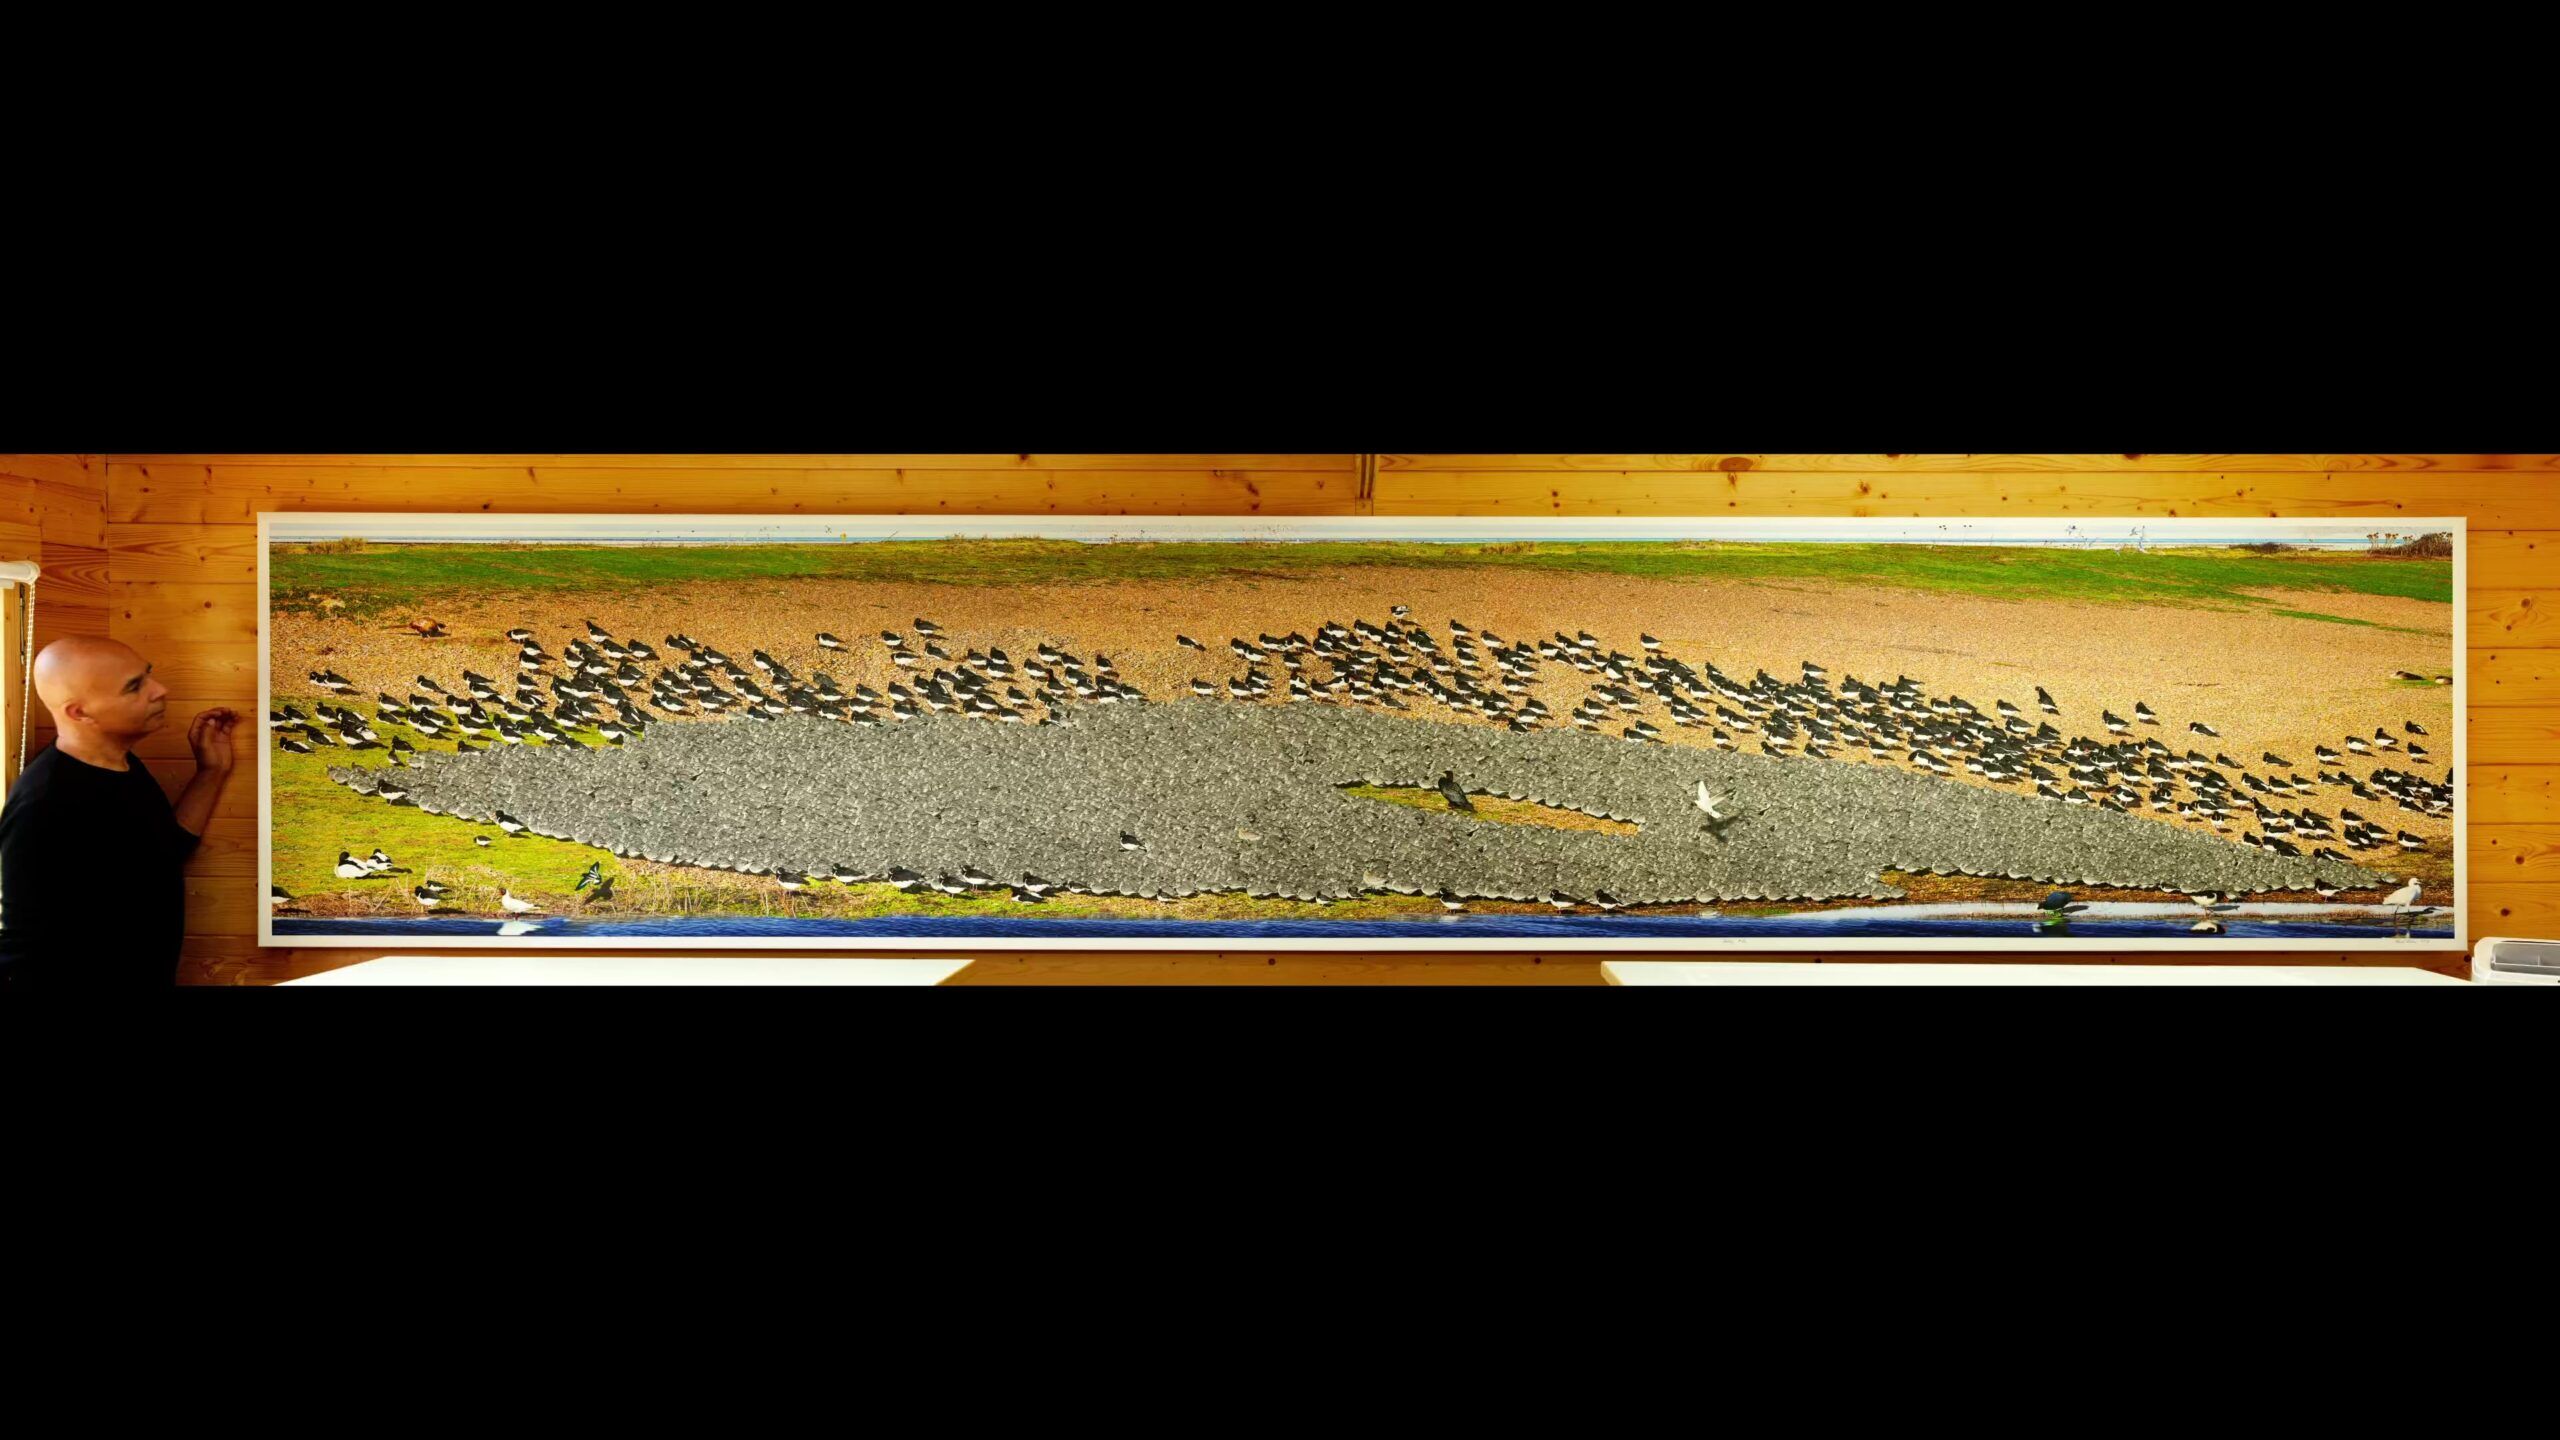
(Catalogue #100_1970-1982: 194” x 36.7” (5m x 1.1m), limited edition of 11)
TL;DR
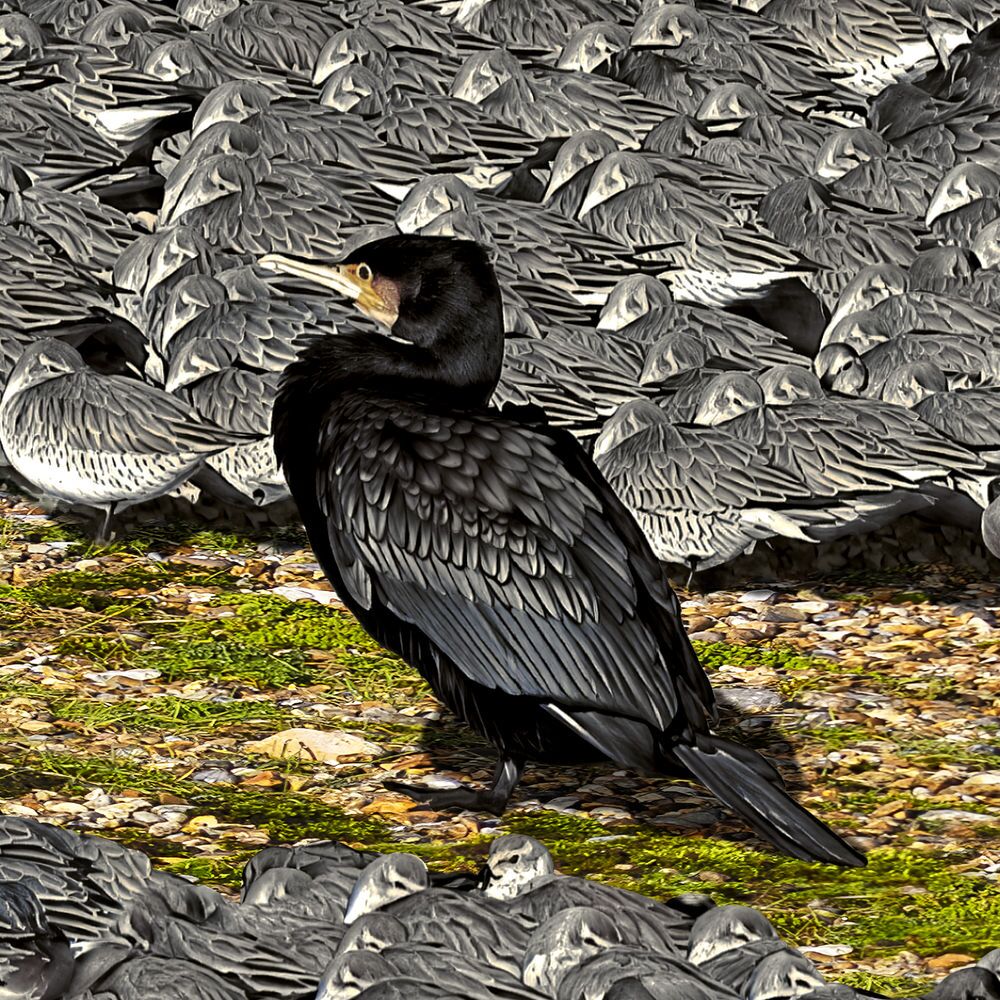
This is a painstakingly reproduced scene (with some artistic licence) of a natural phenomena at Snettisham (U.K.) (the south-eastern part of The Wash – between Norfolk and Lincolnshire) of hundreds of various species of birds roosting on a cold winter’s day – waiting for the tide to go out to resume feeding. The birds are predominantly waders – mudflat/shoreline-foraging, and migratory. What strikes me most about this mass gathering is the different behaviour of the various species – in particular how close they get to their own species and to other species… Each species must have some notion of each of the other species – and form notions about them – such as are they a threat…? One thing for sure is that they all have a concept of others and their own identity… The lone cormorant in the middle of the main flock is a predator (mainly of fish), and wouldn’t normally prey on any of these birds. However, predators usually have similar aggressive, threatening, features – forward-looking eyes, big, sharp, beaks, and are relatively large. The empty space around the cormorant – which would be more or less circular in shape from above – belies what the surrounding birds (knot) think about it…
I’m deeply intrigued, and spellbound, by Nature, and spend a lot of time watching, being mesmerised, and photographing/filming it. Every once in a while I come across something even more amazing than normal…
This scene is as authentic as I saw it, but I have had to overcome the limitations of photography. I have gone to great lengths to faithfully reproduce what I saw in all its detail. It was a very sharp, cold, blustery, early spring morning. The tide was high and these birds were roosting – unable to feed on the mudflats. They were waiting for the tide to go out.
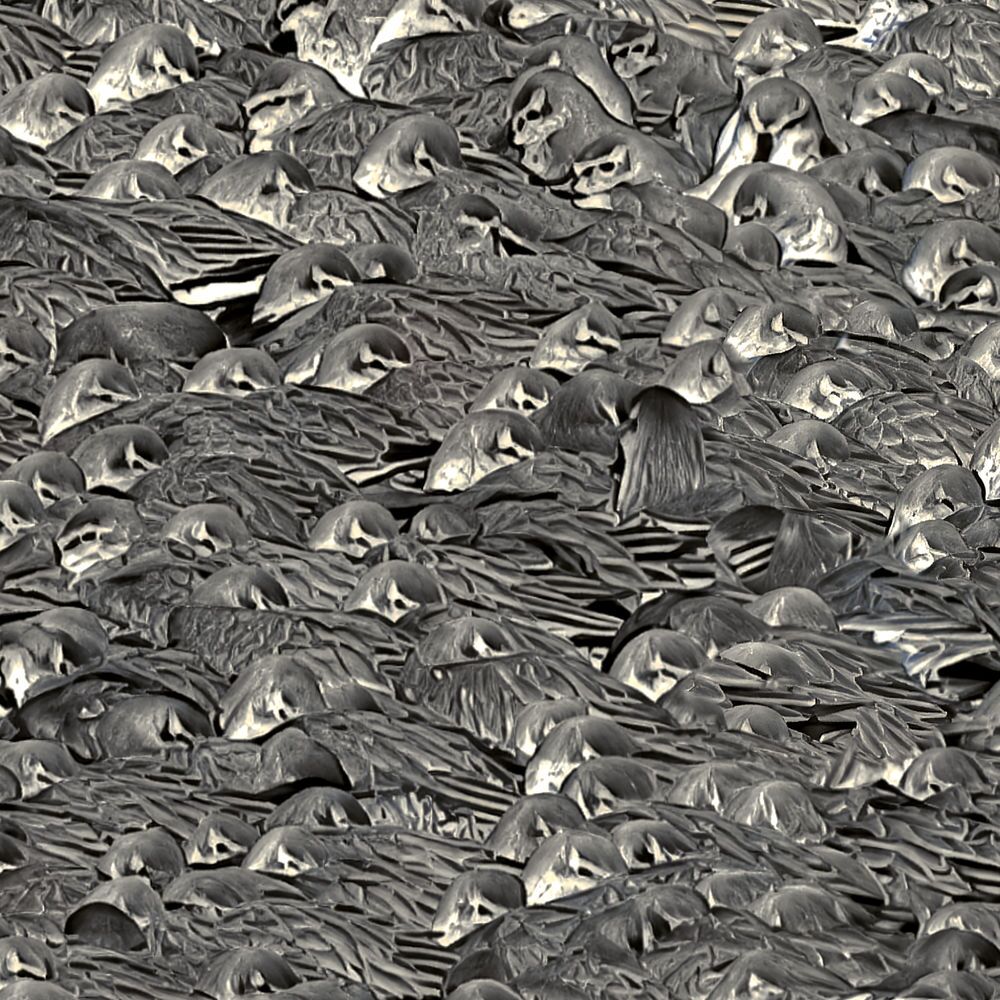
Identity – Knot huddling together detail
Some species like the knot (the predominant grey birds in the 8-10,000 strong central flock) huddle together to keep warm, whereas others don’t. Huddling together to keep warm is perfectly understandable, so why don’t the other species in the scene do it…? Generally in the animal kingdom, the smaller something is, the harder it is for it to keep warm – because its surface area – where warmth escapes – in proportion to size (e.g. height) increases the smaller the animal is (this is simple maths). So in theory this should lead to smaller animals huddling together…? But it’s not as simple as this because there are smaller sized species than the knot that don’t huddle – for example the turnstone (the smallest in the scene). Also, the only slightly larger black and white birds – the oystercatchers – don’t huddle together…
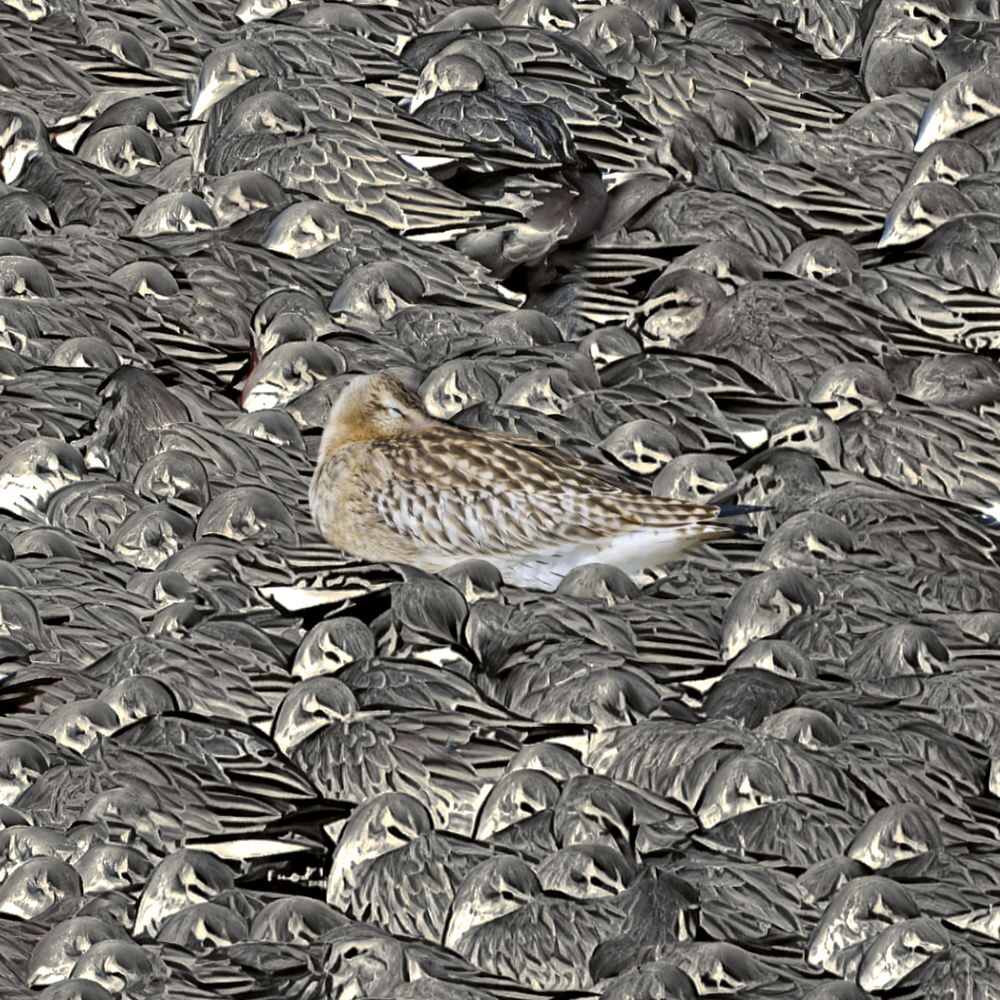
The few individuals of different species engulfed in the sea of knot – the few lone oystercatchers (big black and white birds with bright red beaks) and the bar-tailed godwits (the long-legged buff-coloured birds with long straight beaks) – almost certainly didn’t land in the middle of all the knot. Instead, they were probably slowly engulfed by them as the numbers of knot coming off the mudflats to roost gradually swelled.
Bar-Tailed Godwit engulfed by hundreds of Knot detail
The knot don’t usually go around in one huge flock like this, rather they normally gather in flocks – of anywhere between a handful to a few hundred. While the tide was out and they were feeding, they would have been in these smaller groups. In the last hour or so as the sea slowly rose and covered their feeding grounds, the scattered flocks would have gradually given up the feeding frenzy and come in to roost. Flying over the shingle bank and into this sheltered hollow on the edge of the gravel pit lagoon, they would have seen some of their own already there and joined them – huddling together. The lone birds of other species would have been on their own initially, but as the mass of knot numbers swelled the “loners” would have been slowly engulfed.
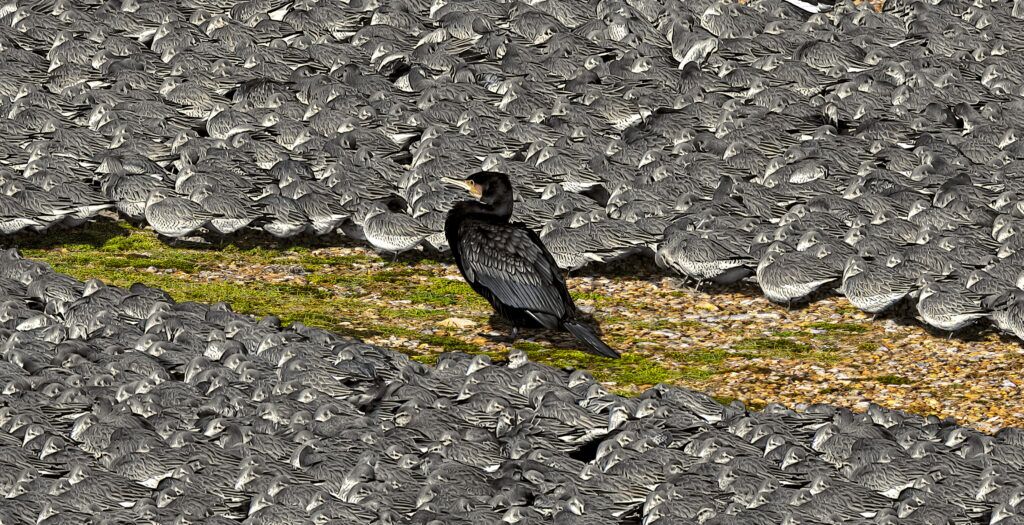
A lone cormorant (predator) isolated in the middle of a huge flock of mainly knot – that want to keep their distance…
For me this image raises lots of questions. Why did the knot feel comfortable getting that close – literally touching – some of those other species – even some that are significantly bigger than them – and not the cormorant (the big black bird in the middle of the big flock)? Does the cormorant look dangerous to them? Did the cormorant try to attack them? I doubt that very much – since they are fish eaters and are not known to be aggressive to other birds. Is it just the look of the cormorant that makes them feel uneasy…? Predators have a knack of looking aggressive. So do the knot – and other species for that matter – have an instinct for what-looks-nasty-probably-is-nasty…?
And what does nasty look like? Two piercing, forward-looking, eyes; a certain stare-you-down-I’d-like-to-eat-you attitude; a big mouth with a sharp beak or teeth…? It is utterly amazing to me how such instincts can be carried in DNA…
What did the cormorant feel – being completely surrounded by a sea of small grey birds that wouldn’t get close to it…? What did the surrounding knot feel – especially those on the inner edge closest to the cormorant…? How did they decide what a safe distance from the cormorant would be? From the side-on view of this conglomeration of birds, the shape of the space around the main predator cormorant looks cigar-like, but from about it would look circular – with the cormorant very much in the centre. The radius of the circle – the distance from the cormorant to the nearest knot (plural) – reflects the average distance the knot are conformable being to the big black predator – the distance they think they could fly off before it could strike at them…
Cormorant close-up
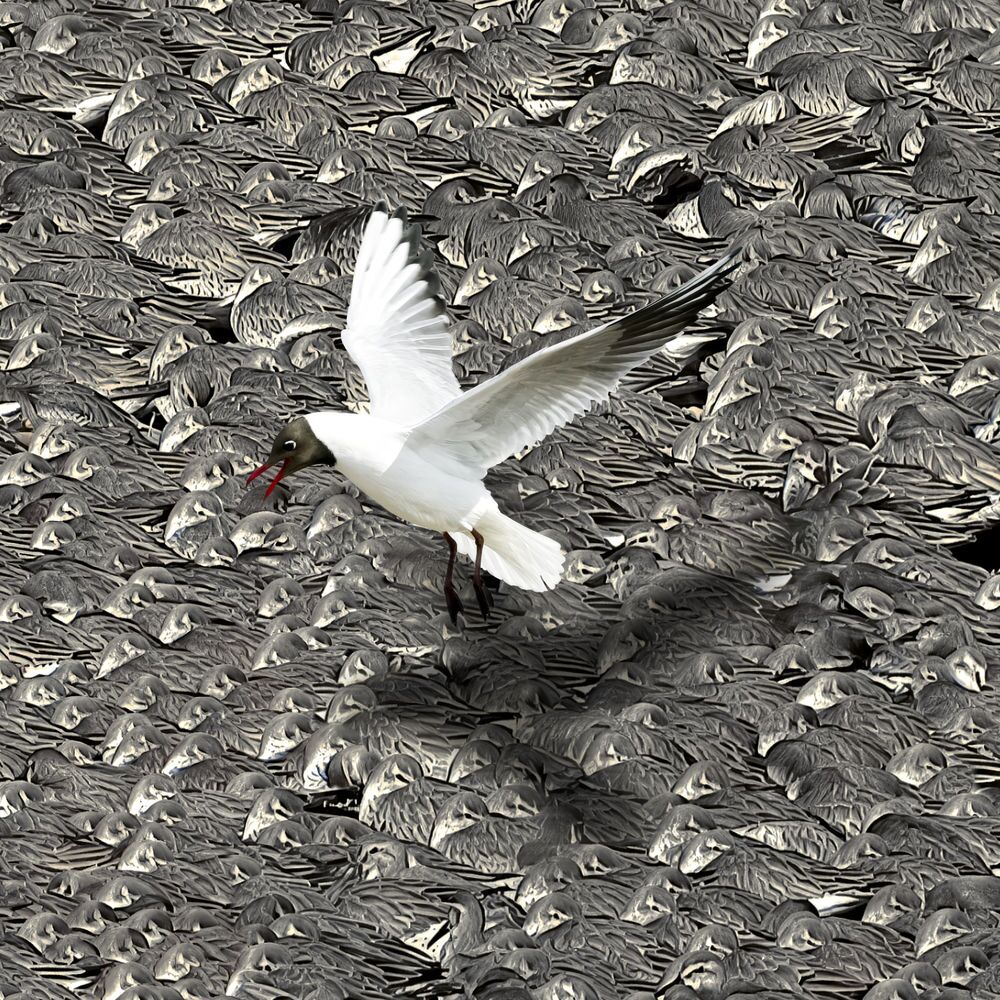
Does the black-headed gull flying over the huge flock think “bloody hell – that’s a lot of birds!”…? Does it even realise that they are birds at all – and not something like stones that it could land on…? How did the “loners” feel as they were being slowly surrounded by the knot – as their numbers swelled…? How do animals identify themselves…? Why are some “outsiders” allowed to get close and not others…?
Going back to the smaller flocks on the mudflats: if there were 8-10,000 individuals in the main roost, and the average size of smaller flocks was 200, then out on the mudflats there must have been somewhere in the region of 40-50 separate flocks of knot. I am interested to know what defines these flocks; how does an individual know it is part of a flock? Is there a leader of each flock? Imagine 200 individual birds foraging in the sand and mud for food: they can’t all spontaneously decide to fly off in the same direction to a roost like the one in the picture – surely one takes the lead? Is it that any one of them can take the lead and all the rest follow…? Or is there a flock leader…?
Black-hooded Gull looking for somewhere to land
Do the members of the flock recognise each other as individuals – or is there just some general sense of belonging and not wanting to be left on their own? I’m not sure it can be the latter because when the main roost broke up, it broke up gradually. A succession of small flocks flew off – back to the mud-flats. There wasn’t one almighty exodus. This implies that while other birds were flying off, something kept the others where they were. Was it that no member of their group had taken flight, or did they have a leader who hadn’t taken flight? This behaviour suggests a high level of small flock individuality. If there was a perceived threat like a fox or human getting too close, then I’m sure the whole roost – all 8-10,000 of them – would have taken flight; but in the normal calm of the roost each small flock seemed to act autonomously – just temporarily taking advantage of the warmth afforded by bigger numbers. I’m not sure we can ever know what is going on in the mind of one of these little birds, but that would be incredibly fascinating to discover…
The parallels between birds and us humans are quite striking. We have our little groups – friends, family, work colleagues, team members, etc. Sometimes we come together in huge crowds – such as sports events, coronations, concerts, evacuations, etc. And when we are in these huge gatherings we are acutely aware of our group and make special effort to keep in contact and move around together – to arrive and depart together. Something may trigger us all to move off together – like the end of an event, or a fire, but we still keep to our personal group wherever possible. There is usually a leader…
I am also interested in how comfortable we are for different people to get close to us. Speaking for myself, generally I am happy for strangers to get within a couple of feet from me (unless they look nasty or threatening); I generally don’t like men to touch me at all, but for male friends it’s okay; I’m happy for women and children to get very close and even touch me; and it is very special and highly desirable for a woman I’m attracted to to get close and touch me…! Indeed, such a woman could trigger an adrenalin rush – where my whole mind and body would become fixated, excited, and physiologically charged…
As for the closeness we will allow other species to get to us, this very much depends on our familiarity with the species, knowledge of their likely behaviour, and our knowledge of specific individuals and their moods. Generally we are comfortable with cats and dogs (the species depends on the cultural norm – so it might be different species in different cultures), but some people are allergic to them, or allergic to specific ones; some people have had bad experiences with them and won’t go near them. Suffice it is to say, familiarity and affection draw us together; unfamiliarity and fear push us apart. It is interesting to note that the young of most species are very cute – giving us the innate feeling of warmth and affection towards them, and wanting to touch them and give them everything they need… It is interesting that many species are programmed to respond in similar ways to cuteness and nastiness…
Cambridge, England 28/10/2004
Update June 2026
I honestly thought this artwork was finished, and so after getting my new very large giclée printer (late in 2025), I was ready to print it this year (April 2026). While preparing to print it, I felt I could make some significant improvements. Mainly I didn’t like the shingle and vegetation – basically all the land – which occupies about 40% of the entire surface area – which is a lot of square feet! I didn’t like it because it lacked colour – I think it had had a coating of dust over the winter months – and/or it hadn’t rained for a long time.
I have hundreds of nature photos, and I looked at some I had taken several years after the original ones for this picture – and the shingle pebbles were really vibrant and multi-coloured – and the vegetation had much nicer, vibrant, greens (probably because they were taken later in the year – like spring). So I set about the mammoth task of masking out all the old shingle and vegetation, and, using nuanced techniques, I “repainted” all the areas I didn’t like with bits of shingle and vegetation I liked from other photos. When I finished this arduous task I then realised I was also unhappy with all the shadows over the old shingle and vegetation I replaced – so I then set about the equally arduous task of replacing all the shadows…!
I also improved the detail on most of the birds – particularly the black and white oystercatchers (and I replaced all their beaks to make them more detailed and to stand out more realistically) – so each bird was meticulously improved. I also added a few more birds (from other photos I have taken since the originals) that appeared (or would usually) over the hours I was there. This involved adding shadows and reflections where appropriate.
If you bear in mind that I try to make everything look as realistic and photographic as possible, you might not be surprised to know that the improvements I mentioned took over 300 hours – about six weeks (which is about as much as the original artwork took)…
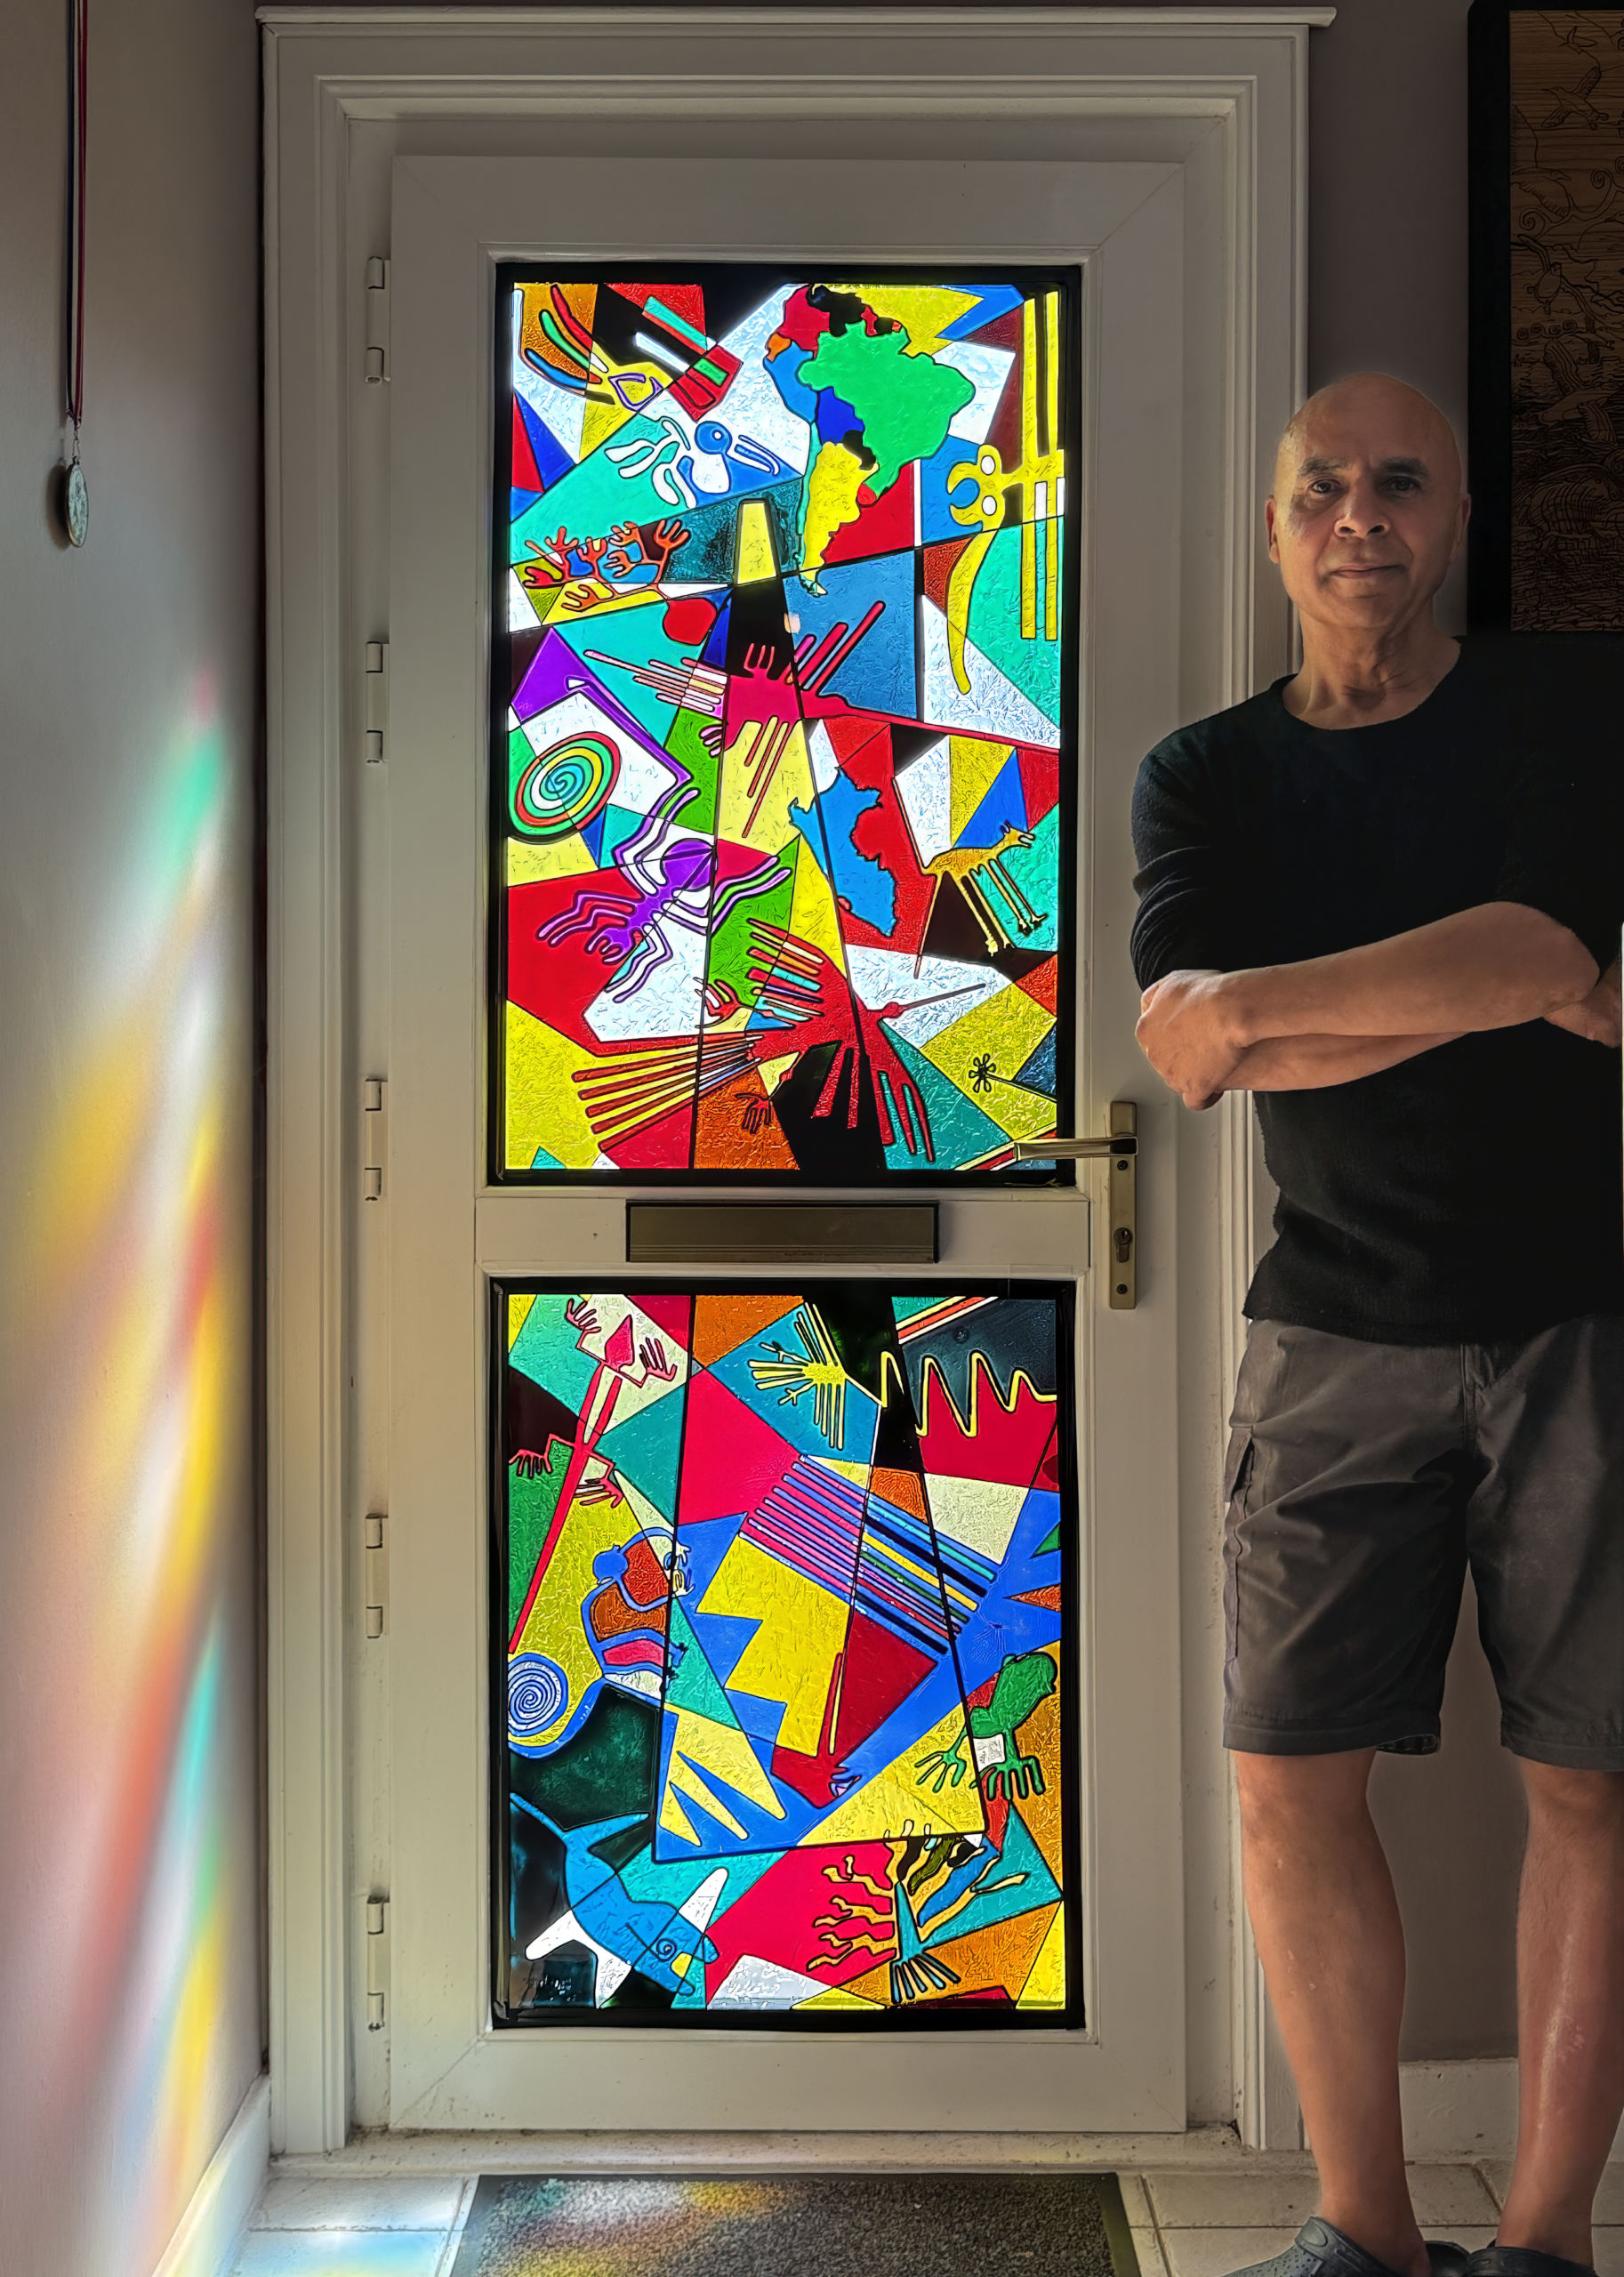
This artwork is my homage to the lines, trapeziums, and animistic geoglyphs of the Nazca desert in Peru – using liquid “stained glass” paints on my pre-cut fretwork design – fixed to a thick sheet of cast clear acrylic – and covered with a glass-smooth layer of non-yellowing clear resin.
Some years back I was lucky enough to tour a lot of Peru and take a plane ride over some of the Nazca lines and geoglyphs. I found them incredibly beautiful, intriguing, mysterious, simple, yet complex. They’re spread over quite a large area (approximately 190 to 385 square miles) of the Nazca desert, and they’ve left a lasting impression on me. For a long time I was quite sceptical about them – thinking they may be fake tourist-bait – apparently only discovered when airplanes started flying over the area… However, I have since learnt a lot more about them – and more have since been discovered and been discovered about them – and I’m now convinced about their age and authenticity.
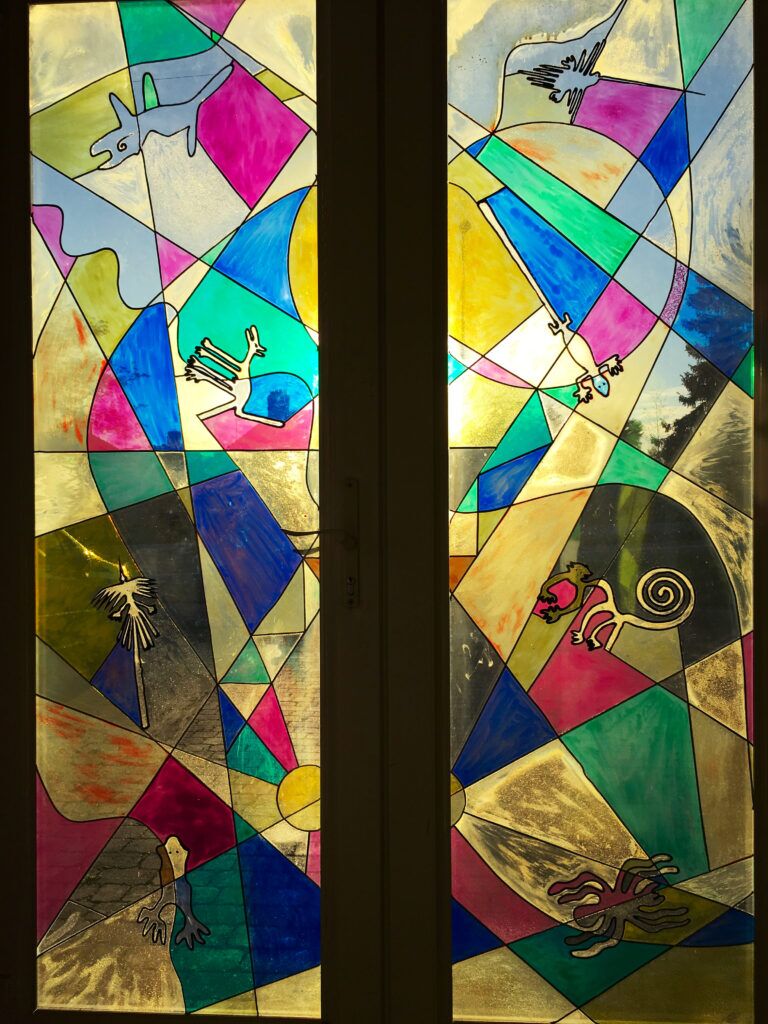
This is in fact my second stained glass artwork about the Nazca lines and geoglyphs. I did my first around about 2001 – for my then new house that I was improving. The house was quite dark so I replaced all the doors and windows with larger double-glazed units. I decided on double front doors to make it easy to get large things in and out (I always have an eye on transporting large artworks). But the double front doors presented a privacy problem because my house faced onto a busy road and there were clear views into the centre of my house! I wanted to have something to let in the light – and thought about mirrored film. I tried some, but it was far too dark. So that gave me the idea of designing a stained glass window…
It was my first attempt at “stained glass”, and I come up with the idea of basing it on the Nazca lines and geoglyphs because I had recently travelled to Peru and made a special excursion to see them. For this artwork I tried to pay homage and condense their essence and aesthetics, and I wanted to express the relationship between the lines, trapeziums, and animistic geoglyphs. Sometimes if you stand too closely to something you can’t see it for what it is – and it helps if someone condenses it and shows you… I used glass paint (I can’t remember the brand) – and adhesive lead-effect strips. I designed it using line (vector) drawing software, printed it out, and used that at my template under the glass. The glass was precisely sized to fit in the frame recess of the double patio doors – so the design had to be split in half vertically (but I took no notice of this in my design).
Original stained glass design for my Cambridge house double front door.
Some twenty-five years later I revisited “stained glass” making – largely because I saw the huge potential for it with my recent interest in lasers. I got into lasers because I saw lots of creative possibilities using them – for example I could draw things – including very intricate things – and cut them out in various materials extremely precisely – and at any scale. My (new) idea for stained glass was to cut out the black “lead” lines of a stained glass design from a thin sheet of opaque plastic, stick that to a thick sheet of clear acrylic, simply pour coloured glass paint into the what-are-now-recessed shapes, and then cover the whole design with a protective layer of clear resin. Much easier than cutting glass and leading it…? My new design took into account the incredible detail and finesse I could achieve – compared to having to used fixed-width “leading”.
However, the sticking of a laser-cut fretwork design on to a sheet of acrylic proved to be more difficult than expected because, firstly, it’s very tricky to glue such a large, fine and delicate lattice evenly all over (many parts were a millimetre wide and very fragile), and, secondly, it’s difficult to get even pressure on it while the glue dries because the surface of the plastic proved to be not completely flat. The latter I only realised afterwards, was because the cuts in the plastic are not completely flat – the reason being the laser cuts by melting it, and that melting – from a close-up side-on view of the cut – is not completely even (top and bottom) – especially at corners – when the laser slows down approaching them, and speeds-up again moving away.
In practice, this imperfect join of the fretwork to the acrylic sheet meant that liquid glass paint poured into individual cells of the design could leak into adjacent cells – which are usually meant to be a different colour. To fix these mistakes required me waiting for the paint in those cells to dry, clean out all the unintended leakages in adjoining cells, before being able to pour paint in them. Naturally the painting process took much longer than anticipated. Big lesson learnt…!
Why don’t I use a commercial professional printing service to produce giclée prints for me – like most people?
Believe me – I wish I could! I searched high and low, but I couldn’t find a printing company that met all my exacting requirements – and I wasn’t prepared to compromise and accept what random permutation of my requirements individual companies happened to offer. My art is too important to me. Most companies were only offering two or three, out of my seven, requirements – which are as follows :-
Using verified archival pigment inks from a highly reputable ink maker (this is currently only EpsonUltraChrome PRO inks as far as I’m concerned)
Using a 12-colour printer. None were offering this! This is because 12-inks is new on the market and most printing companies are using older generations of printer.
Minimum of 60 inches wide. Most only offered 44”. 60”+ is quite niche.
Printing on Hahnemühle Smooth Fine Art 370 canvas. I want the texture of the canvas to be as inconspicuous as possible, and this canvas is the smoothest, most archival, canvas that I know of. It also has the brightest natural white (without using the completely non-archival – and therefore completely unacceptable – optical brightening agents (OBAs)). It also has a matt finish – which looks better from all viewing angles and preserves colours best with random, background lights. Most companies use their own preferred canvas and weren’t prepared to use this!
Mount the canvas on aluminium stretchers. Aluminium stretchers will never twist or warp – unlike with wooden stretchers – something that is especially important with large canvases. No canvas printing companies I researched offered this.
Stretch the canvas leaving a precise specified white margin (aka museum wrap – which I use for limited editions – where I add a title, edition number / edition size, and signing in pencil. No canvas printing companies I researched offered this.
Finish the canvas with a completely invisible, waterproof, archival UV-protective varnish (only one offered this).
Sometimes in life if you want to have a job done well (because you know what well means) then you have to do it yourself…
Why did I want a 60″+ Giclée Printer?
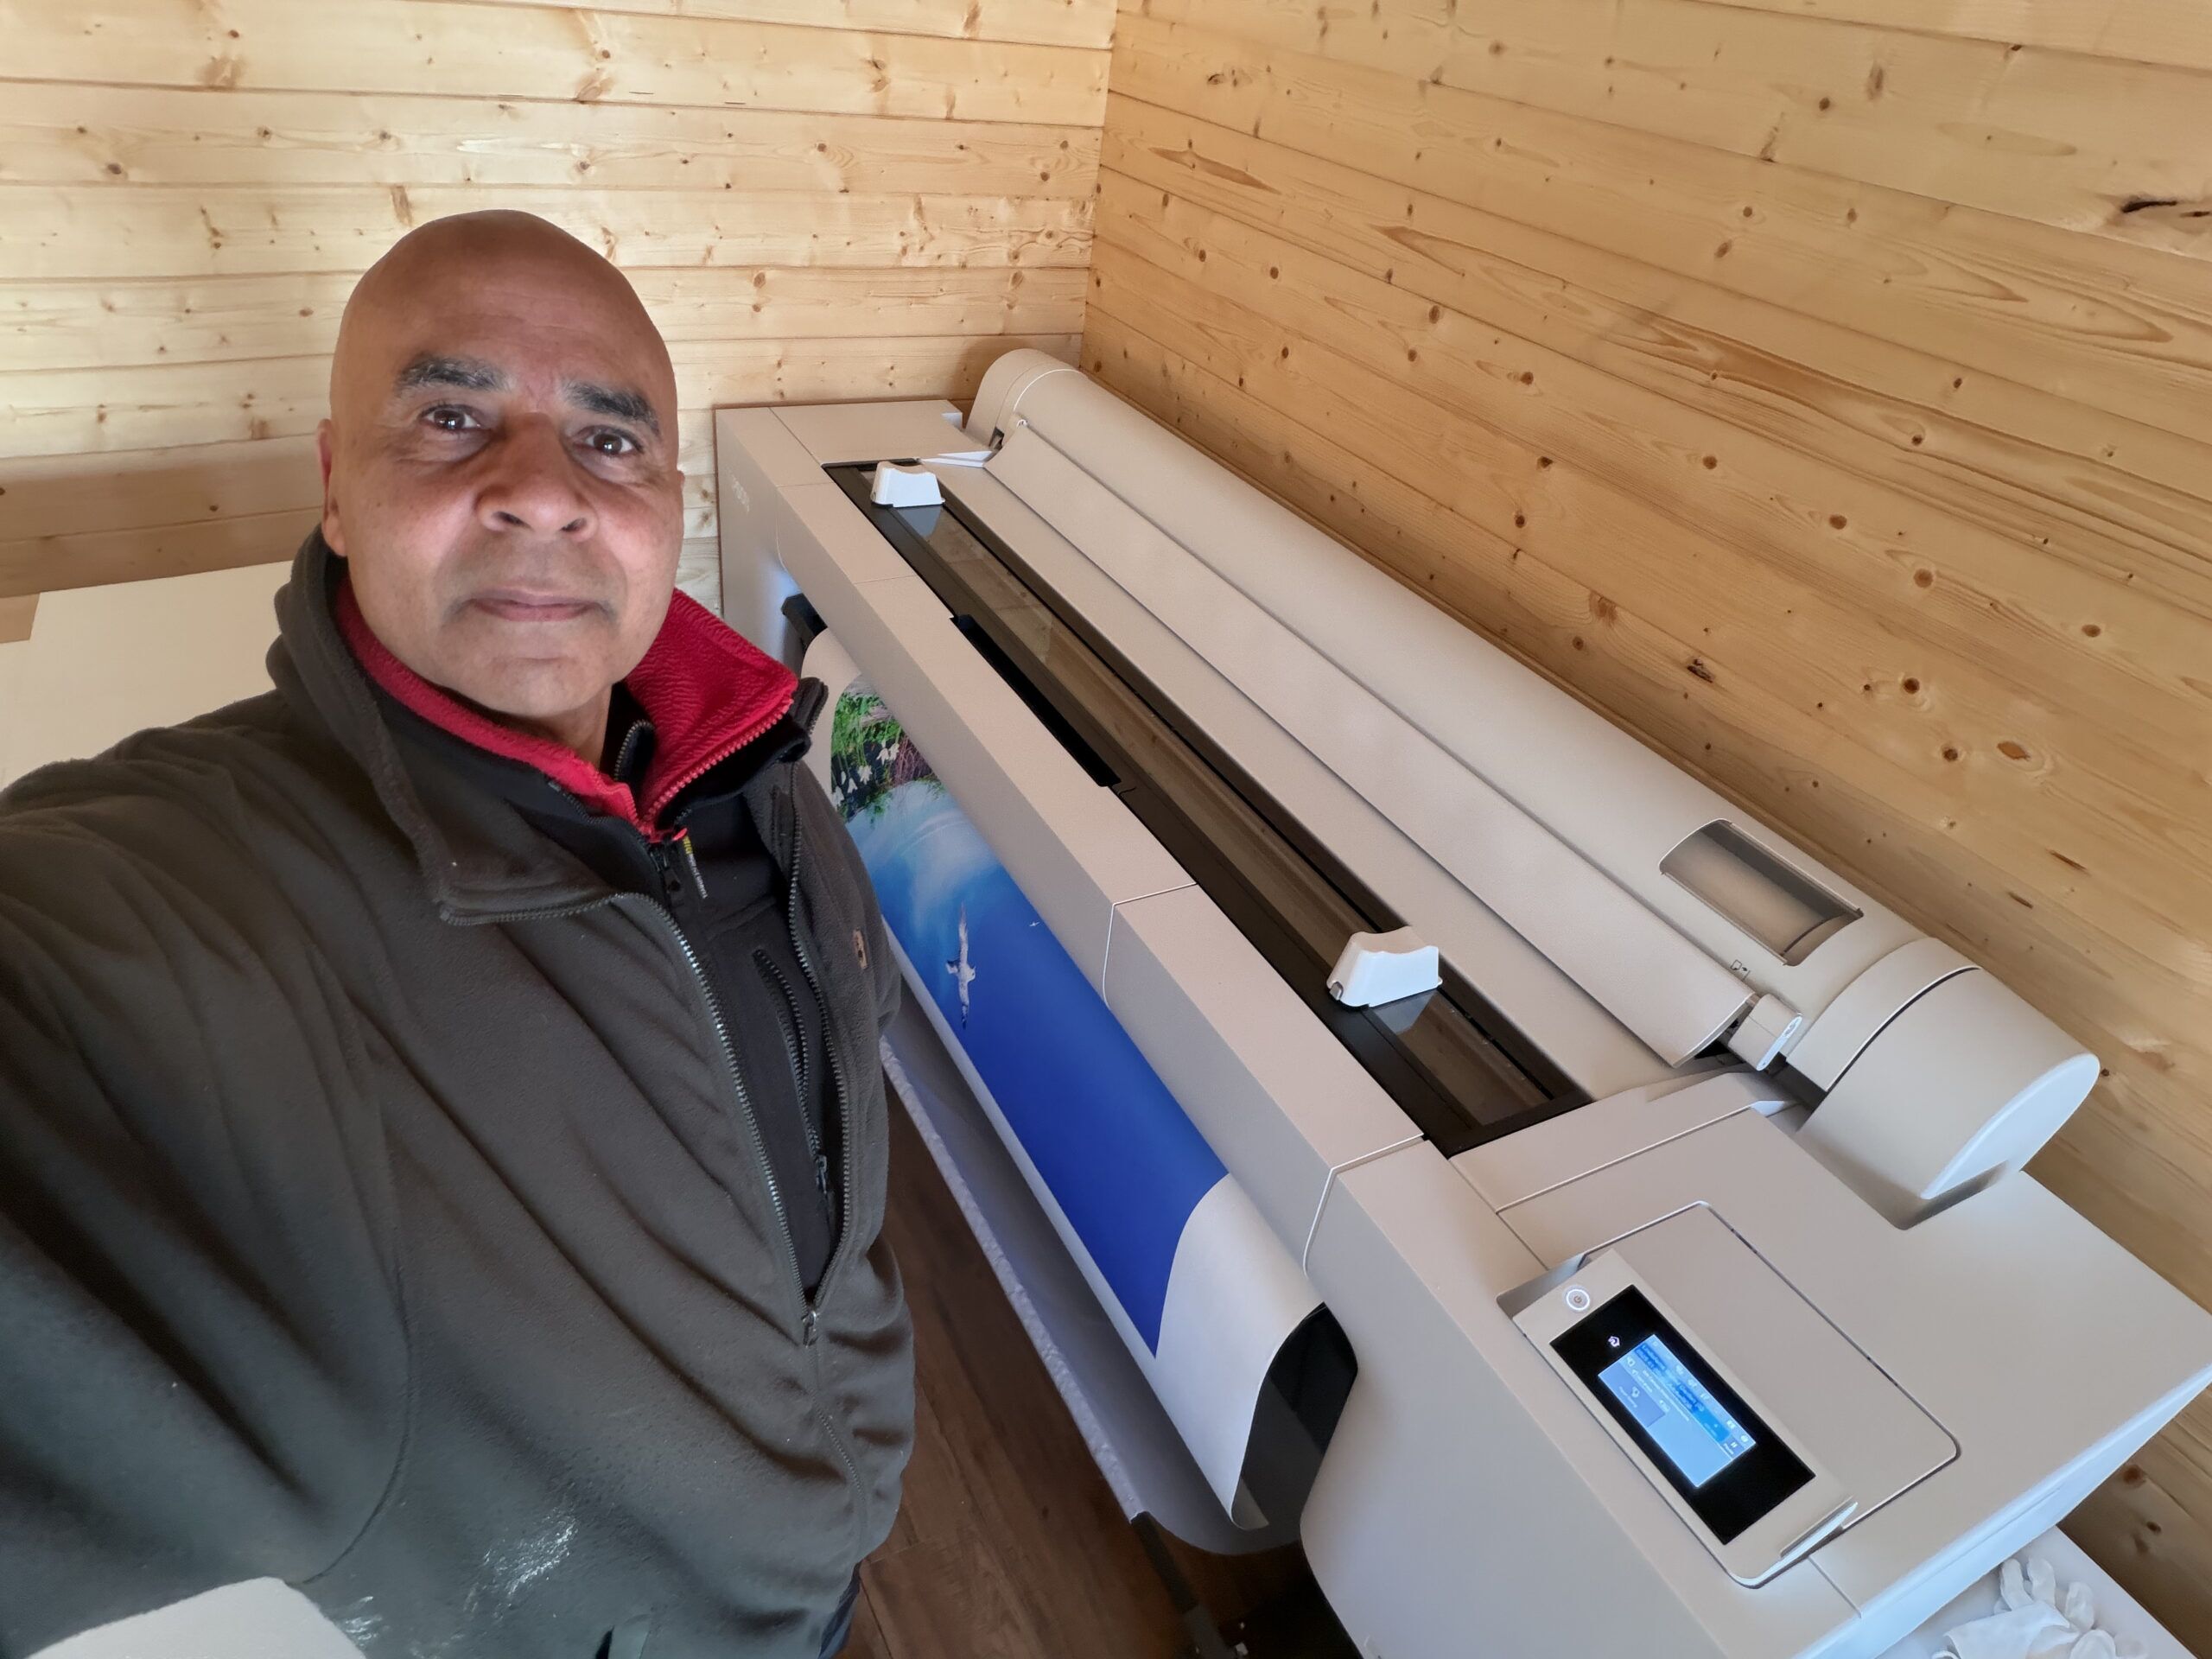
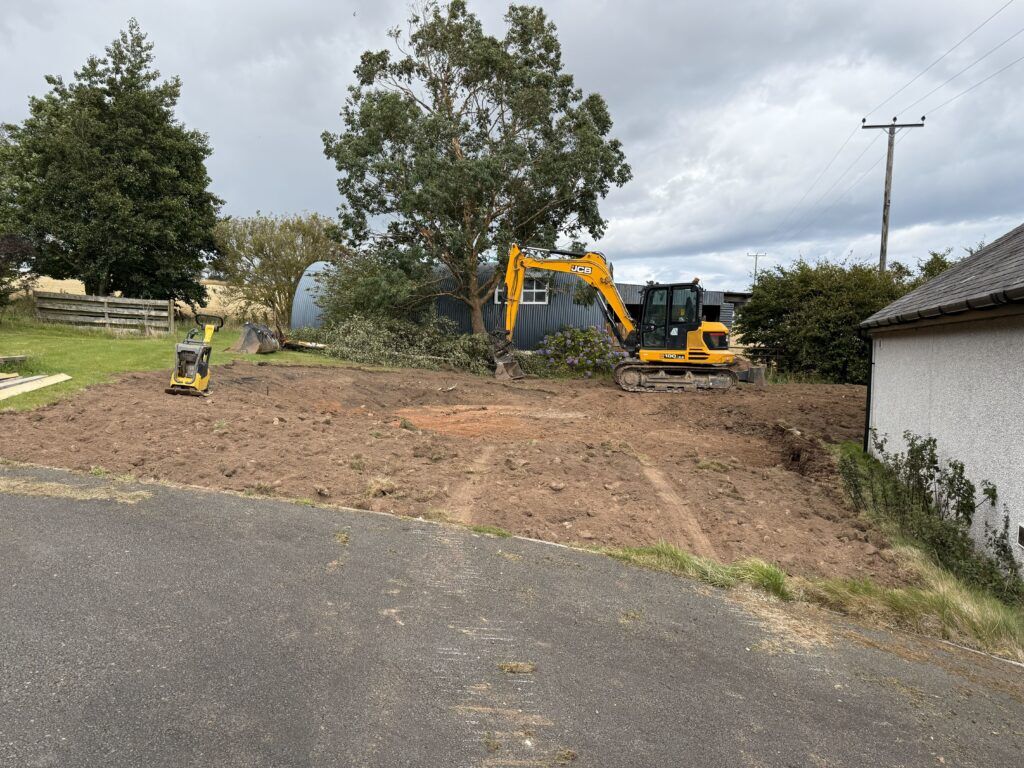
Getting the best 60″+ giclée (pronounced “zhee-clay“) printer (as considered by most in the know) was a big decision for me – not only because of it’s expense (and the twelve 1.6 litre inks for it are half as much again!), but also because it needs quite a lot of working space. That’s the room required to handle, cut, stretch (canvases), mount, and frame the huge prints it produces. I didn’t have anywhere near enough dust-free, clean, space where I live, so before buying the printer I bought space for it – in the form of a new 6m x 6m log cabin (see My new big printer requires a new shed!).
Why did I want such a big printer? I’m an artist, I want to make a big impact. I see big, I think big. I love Nature, and a lot of the time I try to capture or say something about Nature. I don’t like big things being unnecessarily shrunk. Small is easy. Everybody and anybody does small. Point a camera (or more likely a smartphone these days), click, small print. It’s all too quick and too easy, has little or no value, and doesn’t stand out in the crowd. Small doesn’t have a big impact. Large does. Small is not special. Large is much more likely to.
Much, though by no means all, of my art is large and photo-realistic – and is intentionally made to look like photographs (although they are not simply photos – very far from it). In relation to this genre of my art, you could say that I attempt to make “photos” – rather than simply take photos. Unlike photos, I don’t want my art to fade – I want them to last as long as possible – hundreds of years – hence why I got interested in giclée printing and museum framing techniques many years ago.
I’ve been doing this form of art for quite a long time – since the noughties in fact (prior to the that I was doing high-end conventional analogue photography, however, I’ve always conventionally manually drawn and painted as a separate passion). It seemed like a god-given opportunity to me in the beginning of the digital age – and, with my background in computing and photography, I took to it like a duck to water.
Some twenty years ago I bought what was then the best large format 44″ giclée printer. I started producing and framing large scale, highly detailed, and archival artworks (using museum-grade inks, materials and framing techniques) – some of which were accepted by the Royal Academy of Art in London (although I never got around to other galleries or outlets at the time).
My life took an absolutely terrible turn (details of which I needn’t go into) and effectively my creativity was put on hold for about a decade and a half. After fifteen years in the wilderness, I am largely recovered, re-motivated, and re-energised.
Size isn’t everything.
What about quality? What is a giclée printer? A giclée printer is an uncompromisingly high quality, very high resolution, printer that uses archival pigment inks on archival papers and canvases – and produces superb prints that will keep their pristine colours and vibrancy for at least 200 years under normal indoor lighting conditions. First and foremost a giclée printer uses pigment inks. Pigment inks used by giclée printers are among the purest forms of water insoluble colour substances we know of – which we get from rocks (including clays), plants, metals, and some we synthesize – and are the most lightfast colourants generally available. The key word is colourant, because every printing technology tries to change the colour of the surface it is printed on. The crucial question for me – as it should be for all artists and photographers – is how long will the colours remain as vibrant and pure as the day they were originally printed? In addition to the inks used, a key determinant of lightfastness is the material it is printed on – how stable it is over time, and how well does it present (reflect) colours printed (or painted) on it? In this respect cotton – in the form of papers and canvas – is one of the most colour stable and colour faithful print surfaces we know of and use extensively in high end art and printing.
Colour Gamut
Another crucial aspect of giclée printers is called colour gamut. What is the range of colours it can print – and how vibrant are they? Put simply, this is how many colours and tonal ranges a printer can reproduce. In theory only four colours are required to make any reflected colour – Cyan, Magenta, Yellow, and blacK (CMYK). But there is much more to printing than this. Basic CMYK cannot directly produce all the colours we can see, and many colours are achieved quite crudely by the placement of small dots of CMYK colour next to each other – to give the impression of the other colours – like red (from yellow and magenta), blue (from cyan and magenta), and green (from yellow and cyan). However, this effect looks pixelated close-up because you can literally see the patches of dots – so effectively the resolution of basic simple four-colour CMYK printing is low. Also, the vast number of shades of blue and green in nature cannot be reproduced very well with this basic approach.
My printer has twelve colours – the most currently available on any pigment inkjet printer – to give the widest possible range of colours. The set includes dedicated colours for those particularly difficult hues to reproduce by combining other colours – orange, green, and violet. It also has two greys (mid and light), and two blacks – a matte black (for matt surfaces) and a photo black (which reproduces blacks better on a glossy surface) – so it is exceptional at black-and-white prints also.
So, wanting to make as big an art impact as I can, I thought: if I don’t do it now, I probably never will… This new printer is the best of what is available today – and is really only a continuation of where I left off fifteen years ago…
Installation was forced on me!
The steps I went through to get this printer was, firstly, deciding what printer I wanted (back in April 2025), and finding out how much it would cost; secondly, realising I needed to build a log cabin to put it in and researched the options; thirdly, realising I needed a concrete base, researched that, and got one built; fourthly, buying and then building the log cabin, fitting it out, treating the wood inside and out, making a path and building two very large workbenches (I finished in late September 2025); fifthly, revisiting the market to see what the best deal I could get now.
However, in the six months between the first and fifth steps, something very impactful happened: the company who I originally planned to buy the printer from said back in April that the price included delivery, unpacking, removing all the packaging, installation, and training. Great, I thought – that’s a lot of work and worry avoided. However, when I came to ordering it in late September, that delivery deal was no longer available because the third-party company who provided that service decided, for whatever reason, not to do it anymore – and it turned out they were the only company in the country providing that service… So, I was left with the daunting prospect of doing everything myself…!
The printer was hands down the biggest and heaviest thing I have ever had to handle – (and I have handled quite a few large machines in my time – including big CNC machines, a big industrial laser, and other big woodworking machines).
Using my heavy-duty pallet jack, my neighbour and I managed to roll the huge 3.5m x 1.5m x 1m printer box from the driveway (where the tractor forklift took it as close as it could), along my newly built path, into the log cabin (over a carefully designed double ramp I built). We managed to get all the surrounding cardboard and most of the polystyrene off it. There was a daunting number of pieces in bags and boxes of various sizes, and labelled bags of nuts and bolts.
With the main printer chassis propped up on big dense blocks of polystyrene resting on the huge pallet, we set about assembling all the other pieces as much as we could – including the stand (which also had to be assembled). It was by no means straightforward, and some parts were incredibly confusing as to where they were supposed to go – or how they were supposed to be fixed in position. The instructions were far from clear, and the order some things should have been done was utterly confusing at times. Anyway, after about three hours, all that was left to do was to lift the printer on to the wheeled stand. And, because this required at least five people, we stopped working on it that day – and I was left with trying to rope in a couple of other near neighbours to help. I did manage to get their commitment, and we scheduled a day (the following week) where the five of us could do it.
It required four guys to lift/move the printer onto the nearby stand – and two people to guide us on to the stand and pull the big pieces of polystyrene out from underneath it. The whole 6m by 6m log cabin felt full to the brim with all the packaging it came in, and the pallet it was transported on was so heavy that it took four of us to carry it out of the log cabin afterwards!
It was quite a mammoth effort to move and assemble the printer – something that was never even discussed in the sales process – nor even mentioned on the manufacturer’s website…! In hindsight I don’t think this printer should ever be sold without a full installation commitment by an experienced dedicated team. Leaving it to the customer is a huge ask, and, with so much difficult and delicate assembly required by the customer, it begs the question how the manufacturer can offer any warranty – let alone two years…
Then there was the clean-up of all the packaging. It was one hell of a job fitting all the polystyrene in my hatchback – to take it to the recycling centre. And there were huge sheets and boxes of thick cardboard that I just dumped in my large shed for the time being – until I decide what to do with it.
Installing the inks was no simple matter either! The instructions were useless, and I couldn’t find any clearer instructions or videos online. The 1.6 litre flimsy-looking flexible plastic bag ink pouches are extremely expensive – at nearly £500 each – so you really want to put them in properly – and not leak or tear them…!
Ink charging
The printer comes completely empty of ink, and filling the required system components with ink known as ink-charging. What I don’t understand is why doesn’t the printer come with a small sized set of starter inks for this purpose – like every printer has that I have ever bought up until this one…? And why does this ink-charging process take a whopping 45 minutes – and require two- and a-bit maintenance tanks to be filled with “waste” ink?! The printer came with six maintenance tanks – three of which were already in the printer, however, two of these – exactly as explained in the instructions – were completely filled – and needed to be discarded and replaced with new ones – during this initial ink-charging!
I compared the weight of a used, full (and therefore needing to be disposed of), maintenance tank, with a new empty one, and I estimate there was about a half a kilo of weight difference. A kilogram is roughly the weight of one litre of liquid (with a similar density to water), and so this means that, over and above the ink used to fill the many metres of tubing in the printer, the ink charging squirted out a total of well over a litre ( spread over all twelve ink pouches) straight into the waste maintenance tanks! That’s about 10% of the £6,000 worth of ink – straight into the bin – including two maintenance tanks…!
Colour-Proofing
With the printer all set up, the next task was to load it up with some canvas and do some test prints. A crucial step was to calibrate my new proofing computer monitor with the inks and the Hahnemühle canvas in the printer. Having done a lot of colour proofing before, this should have been quick and easy to do. Was it heck! There turned out to be a completely unexpected red herring in the form of Hahnemühle’s Fine Art Smooth Canvas ICC colour profile. This is the ICC colour profile I should be using: it’s made specifically for this canvas and this printer’s inks – and is supplied by Hahnemühle! However, it consistently produced weird small black streaks on the same parts of the print. Over four days I tried absolutely everything I could think of to get rid of these disastrous black streaks – wasting lots of canvas and ink in the process. In the end, by a process of elimination, it turned out to be a weird fault with Hahnemühle’s ICC colour profile -because when I tested the same print with Epson’s Matt Canvas ICC colour profile for this printer, it printed perfectly every time. I’m really annoyed with Hahnemühle about this because it wasted so much of my time, ink and canvas. What kind of testing did they do – if any – because the very first time I tried to use it, I ran into this problem…?!
Final Thoughts
The cost of getting top-quality commercial prints done is very high – often running into hundreds of pounds each – which is okay if you have confirmed sales (or a lot of money). During the creative process there is no guarantee for most artists that any artwork will sell, so the individual cost of experimental or test prints can be quite off-putting, and stifling of creativity.
By owning such a versatile and brilliant printer as this one, I can experiment with different sizes and media – and can simply re-do prints if I’m not happy with them. So, although the up-front cost (and effort!) was enormous, I don’t have to worry much about each print individual I do…
The printer is an extremely versatile and power tool, and by owning it I can explore all its capabilities – creative and technical opportunities that would otherwise be completely unavailable to me.
As an artist, it’s a dream come true to have such a printer – to have such a fabulous creative instrument in my toolbox. And I bought it for that reason alone. However, some companies make good money printing for clients who want the best. This commercial opportunity, coupled with the potential I have for selling my own limited and unlimited edition prints, could mean I will reap financial rewards with it. Indeed, it is far from impossible or improbably that, in time, it will comfortably pay for itself – and more…
Finally, from a providence and buyer’s perspective, it is surely much better for customers to know that I, the artist, printed and handled the artworks – as opposed to a random commercial printer…?
Much, though by no means all, of my art is large and photo-realistic – and is intentionally made to look like photographs (although they are not simple photos – very far from it). In relation to this genre of art, you could say that I attempt to make photos – rather than simply take photos. Unlike photos, I didn’t want my art to fade – I wanted it to last as long as possible – hundreds of years – hence why I got interested in giclée printing and museum framing techniques.
I’ve been doing this form of art for quite a long time – since the noughties in fact (prior to that I was doing high-end conventional analogue photography – and I’ve always drawn and painted as a separate passion). It seemed like a god-given opportunity to me of the then new digital age – and, with my background in computing and photography, I took to it like a duck to water.
Some twenty years ago I bought what was then the best large format 44″ giclée (pronounced “zhee-clay“) printer (a very high quality printer that uses archival pigment inks on archival papers and canvases – and produces superb prints that will keep their pristine colours and vibrancy for at least 200 years under normal indoor lighting conditions). I started producing and framing largescale, highly detailed, and archival artworks (using museum-grade inks, materials and framing techniques) – some of which were accepted by the Royal Academy of Art in London (although I never got around to other galleries or outlets at the time).
My life took an absolutely terrible turn (details of which I needn’t go into) and effectively my creativity was put on hold for about a decade and a half. After fifteen years in the wilderness, I am largely recovered, re-motivated, and re-energised.
At the beginning of this year (2025) when I decided to get what is widely regarded (by those in the know) as the best large format 64″ giclée printer, the first obstacle to overcome was where on earth was I going to put it?! At 3.5m wide, 1.5m deep, just over 1m high, and weighing about 250kg – there was no room in my house (in any case it would be impossible to get it in the house because no doors are wide enough!). Also there was not enough room in my far-from-small studio/workshop because it was maxed out with tools, lasers, a CNC machine, and workbenches – besides, I wanted somewhere very clean and free of dust for highest quality printing. Building an extension to the house would have been far too expensive (and slow), so I decided to get a log cabin (that wouldn’t require a lengthy and expensive planning application).
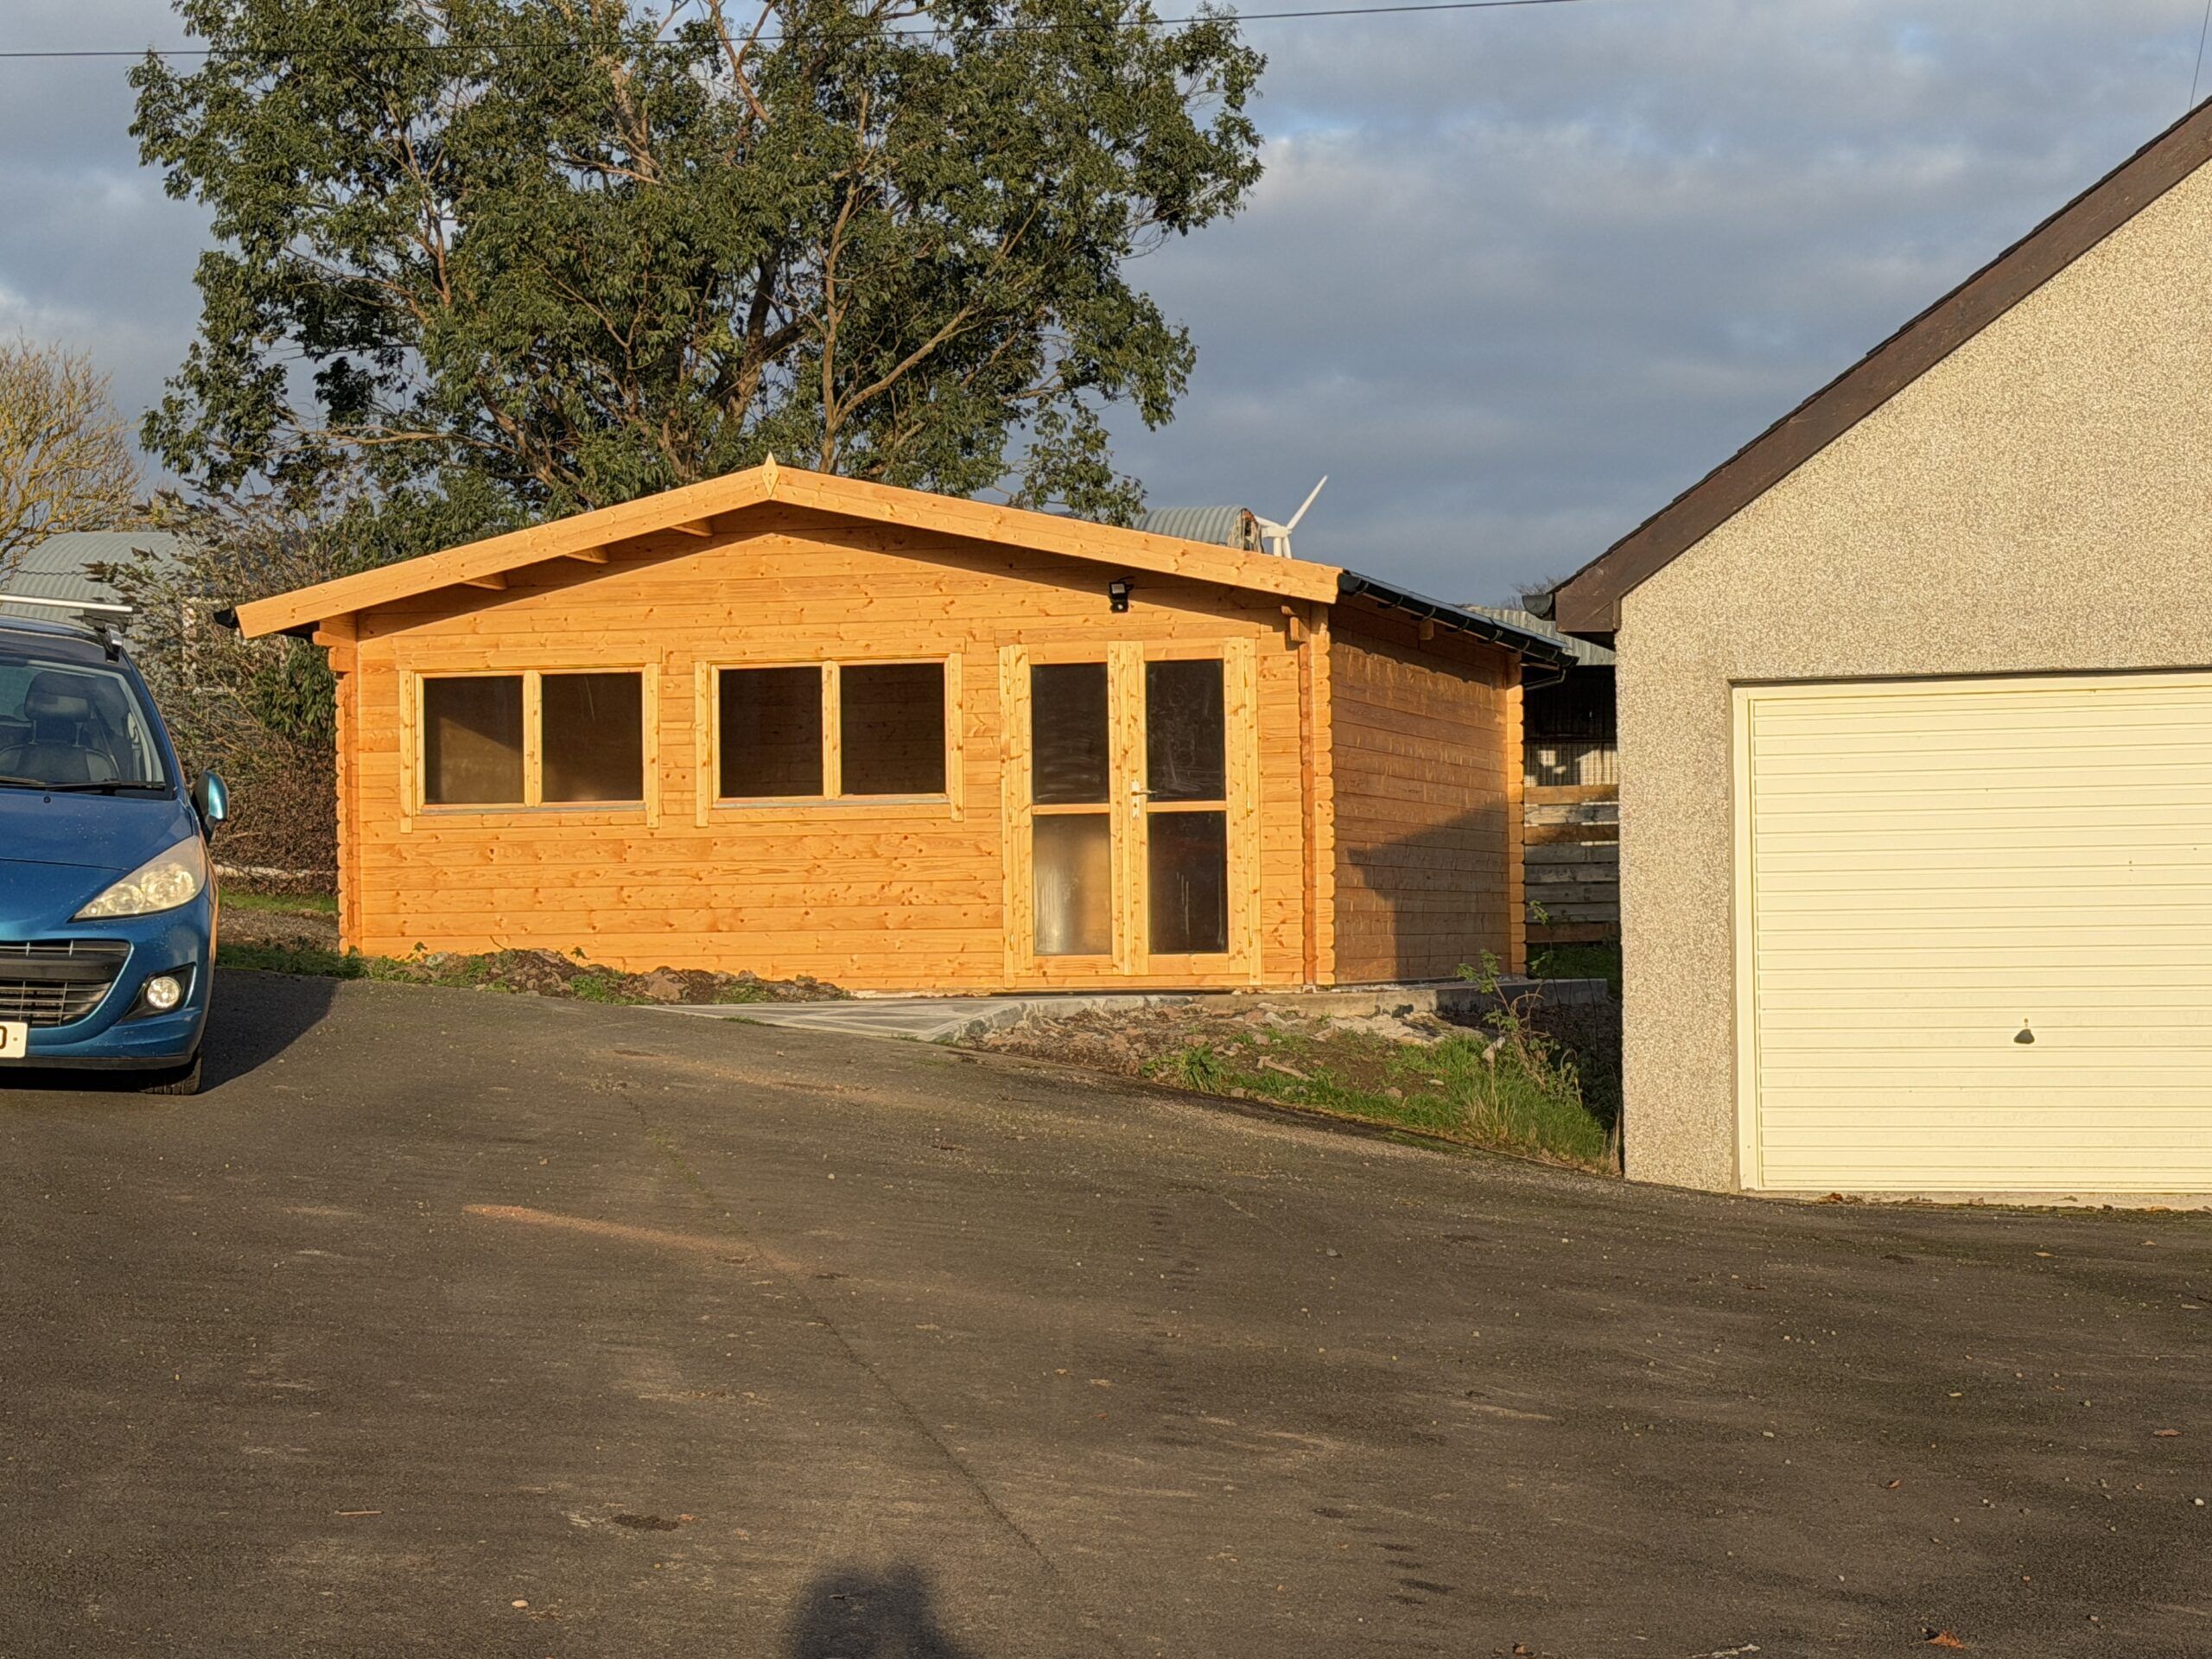
Originally I naively hoped to get something like a 12m x 8m building, but after much searching for a good quality log cabin supplier, and the shock of how little square meterage you get for your money(!), I plumped for a 6m x 6m x 2.5m unit – that being the minimum I could usefully use and could just about afford (allowing for the fact I had a very expensive printer to buy – along with the also very expensive inks, archival printing canvas, very large workbenches, etc.). Next, I had to decide where to put it. The patch of land between the studio and the workshop seemed the best option.
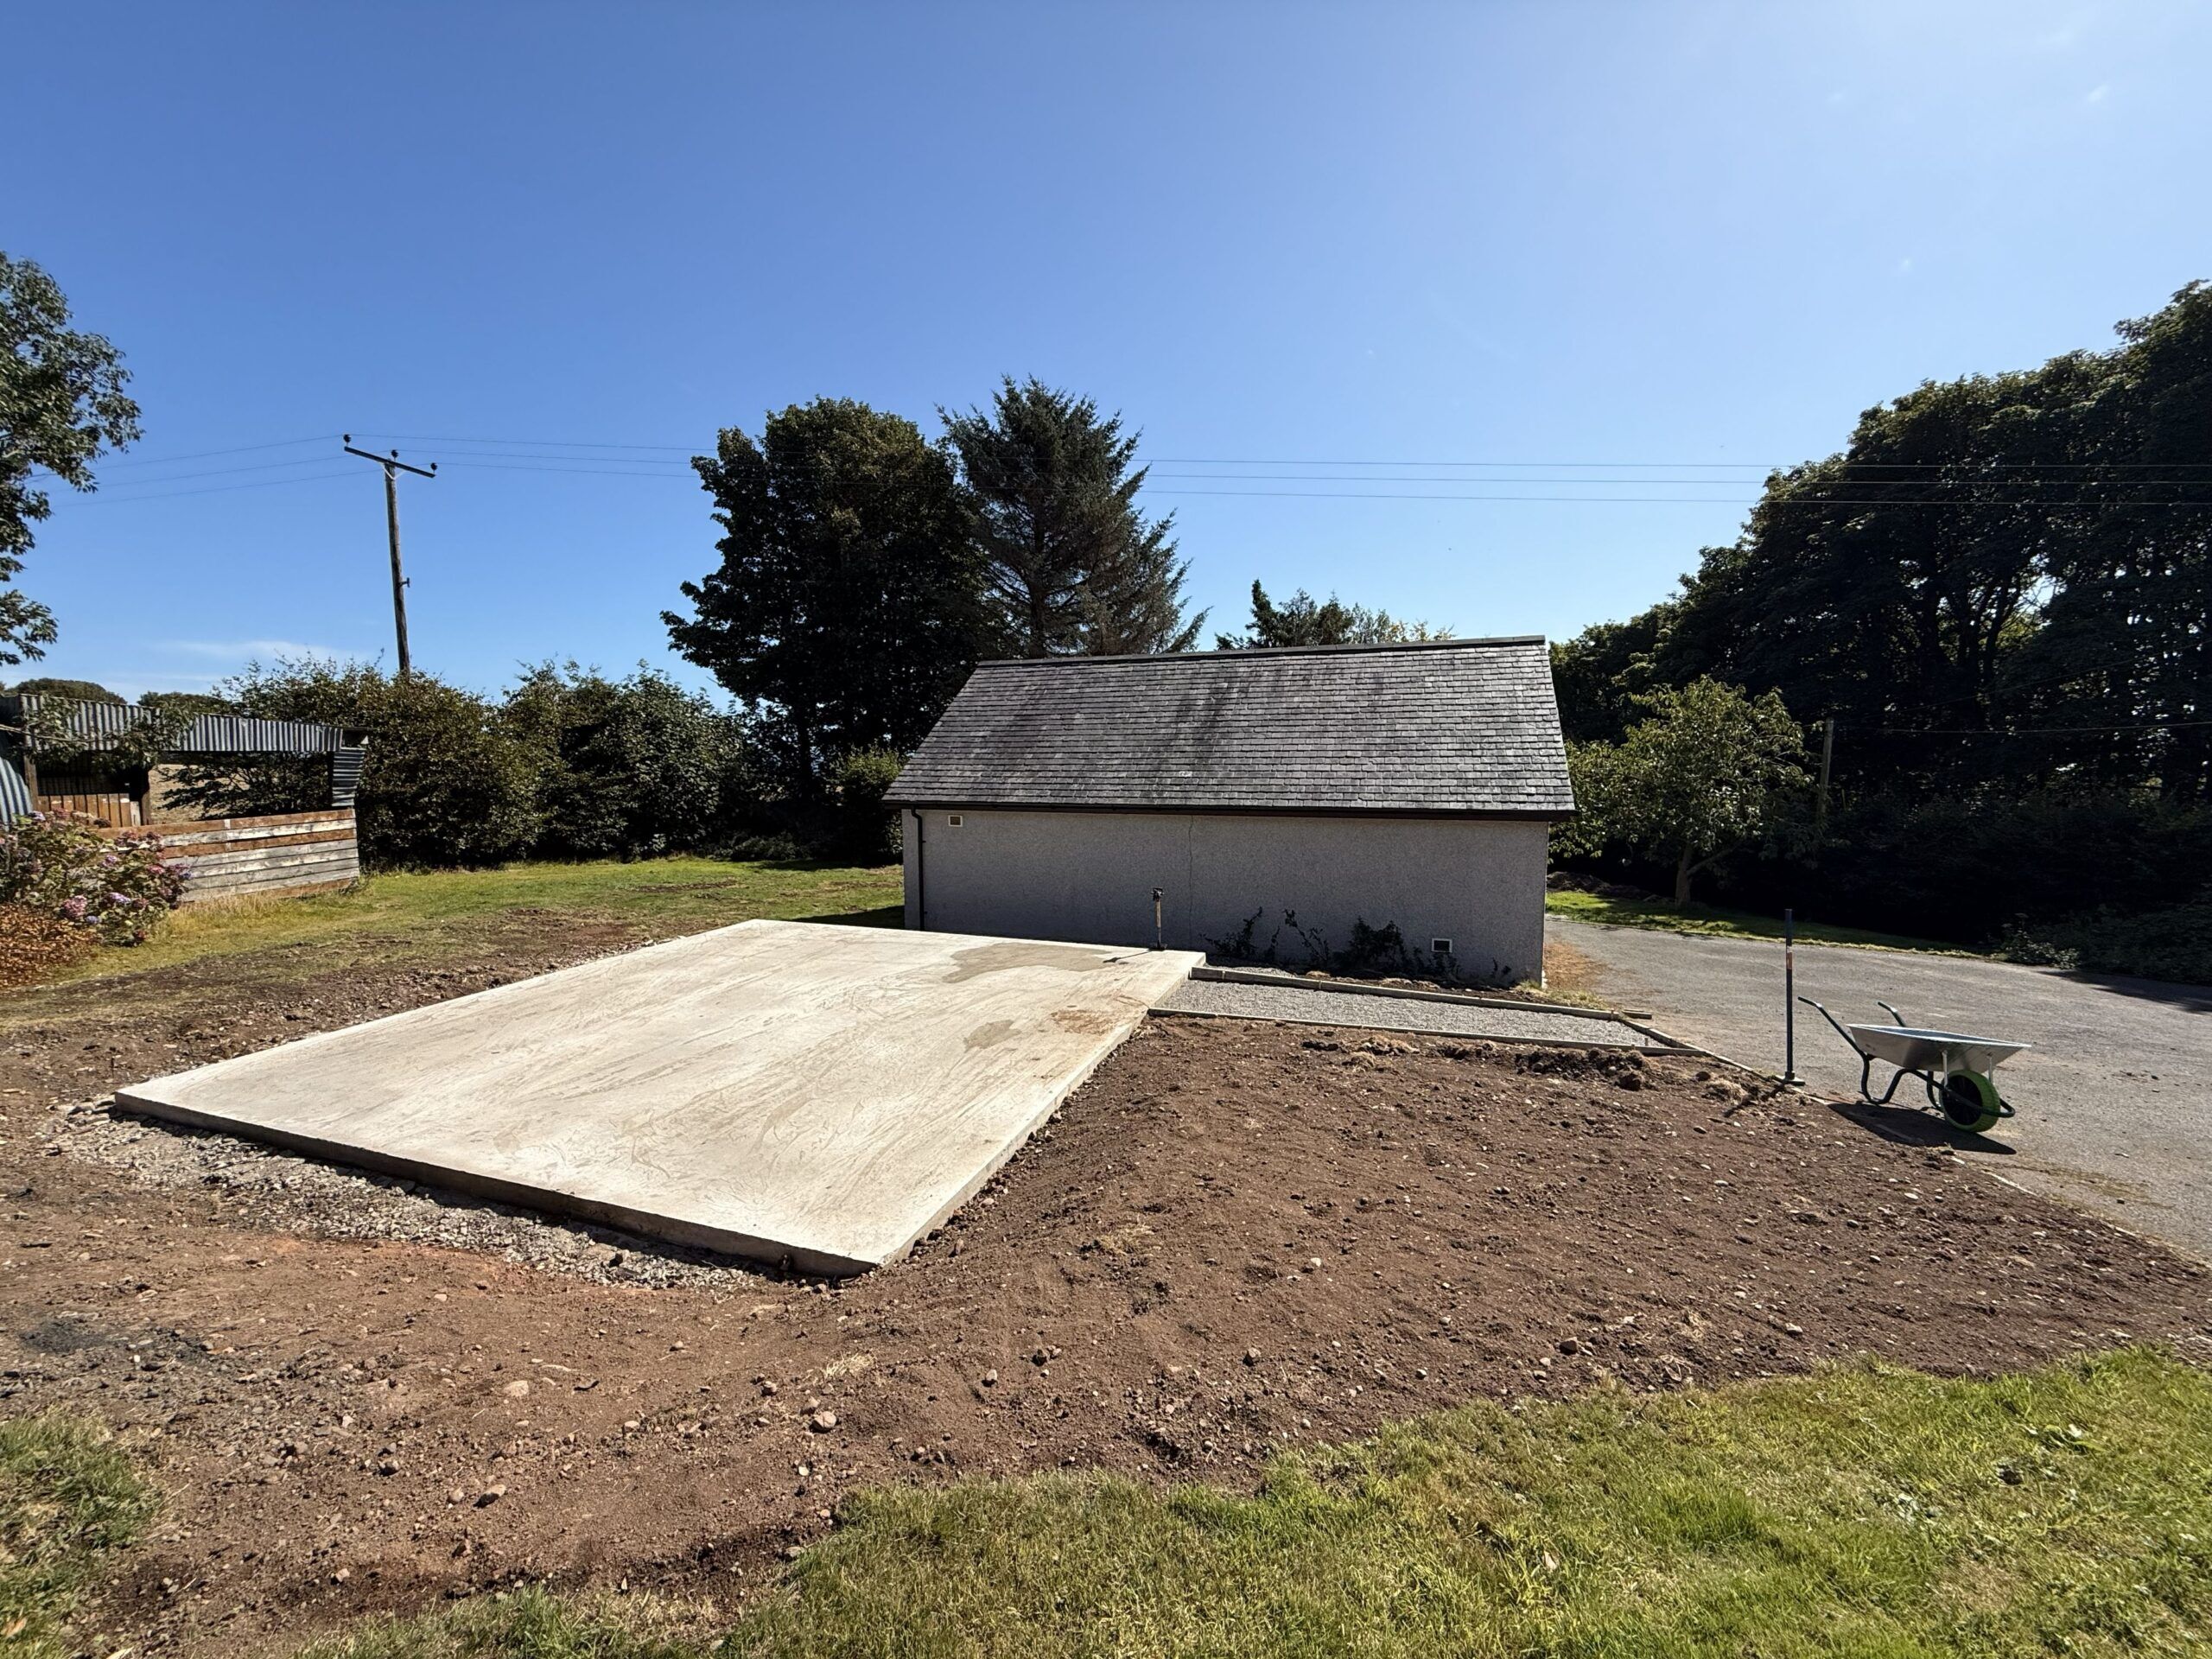
The site where the log cabin is going – between studio and workshop, and just off the driveway
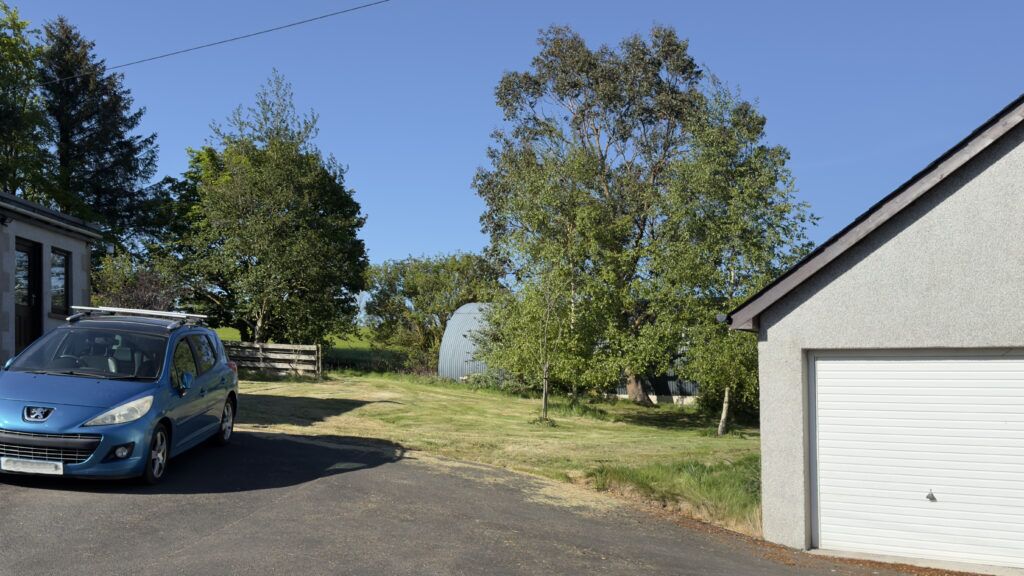
I ran the proposal past the county council planning department – just to make sure it came under “Permitted Development” – which it did – so I didn’t need planning permission. I had to get the base area firstly excavated and then get a concrete base put down (this I couldn’t do myself so I used a contractor).
Contractor levelled and prepared the ground for the log cabin
If I wasn’t watching the concrete base being built, only half of the base would have had a dampproof membrane – until I insisted…!
The completed concrete base (100mm thick on 100mm hardcore) (done by a contractor)
I left the ordering of the log cabin (which comes in kit form) until the base was finished. Then I (re-)looked extensively for the best quality and deal I could find. When I came to a decision it was mid August. I wanted to go with a local supplier but they couldn’t deliver until mid October. The thought of putting up the log cabin in mid autumn – with the high probability of rain, frosts, strong winds – put me off. So I checked the delivery estimate of my second choice. They said three weeks. Decision made.
Undaunted by such challenges, I decided to build the log cabin myself (from a kit) – both to save money, but also to be in total control of the quality of the build and the materials used. From quite a lot of experience, I have little faith in “handymen” – who often cut corners, do things as quickly and as cheaply as possible. I’m quite practical, patient, have some common sense, and can seek advice and/or find out anything I want to know.
I took my time – doing everything as best as I could, and using the best materials and techniques I either knew or researched. The September weather was absolutely gorgeous – sometimes too gorgeous (too hot)! I had a large tarpaulin to cover the timber over night and when it rained (which wasn’t often).
I lost quite a lot of time during the log cabin build because of receiving visitors over the North East Open Studios (NEOS) ten open days in early September (which I committed to back in January). But I like/liked meeting people interested in my art. It’s what art all about…? So whenever visitors turned up, I just downed tools, was probably filthy and stinking of sweat(!) – and gave them as much time as they wanted (which was often quite a lot).
The build was enjoyable for the most part. The instructions weren’t as clear as they could have been, the timber pieces weren’t labelled, and because many were very similar (but subtly different)- and there were unspecified spare pieces – it was very confusing at times. The most difficult part was the path leading from the drive to the log cabin – getting big and heavy concrete paving slabs to slope in two planes from level to the steep slope of the drive. But I got there in the end. It was very satisfying…
We noticed you're visiting from Bulgaria. We've updated our prices to Euro for your shopping convenience. Use Pound sterling instead.Dismiss